Thursday, July 21, 2016

Freakshow Films: Home For The Holidays.

I haven't been posting reviews for the movies I watch as often as I should, and since we're nearing another wonderful October, it's time to get our caramel corn out and enjoy the ensuing flood of horror movies on Netflix and the like!

The first of the season I got my grubby hands on is:

Holidays (2016)


I started watching it before reading the complete synopsis, seduced by the movie poster, and discovered it's a series of short films according to each holiday-- including mother's day, father's day and New Years-- an anthology.

Oddly enough Thanksgiving was not included in the illustrious bunch of celebratory days... I think they missed a good opportunity there.

I also think they shot for the wrong audience when writing Halloween; it was terrible, and not the good kind of terrible...
I don't know what they were heading at exactly, but it came off cheap and utterly predictable. Bad writing, bad acting, bad setting-- just all around disappointing. Very sad to say it was my least favorite segment.

It has a very retro slasher feel throughout; I could see this becoming a cult classic, despite and because of its obvious short comings.

I would give it 4 and a half out of 10 spooky bats. The best parts are in my opinion the ones I least expected to be good. I wouldn't rush to see it, but should it come up on your queue I'd say give it a watch-- it's still worth its weight in afternoon entertainment.

What is on your queue this spooky season?

Tuesday, July 19, 2016

Mortem's Apothecarium: The Hair On Your Brushes Need Some Attention.

Since I have been painting with watercolors I've been going through cleaning solvent like crazy. I have been using makeup cleaner on my watercolor brushes because watercolor paints have a fairly similar chemical makeup as well... make up lol, and the bristles on watercolor brushes are typically the same quality as a makeup brush, some are even made with real fur.
They require the exact same care... but even for the cheapest cleaning solution ($3 for ELF 2 fl oz), it's not quite the best frugal choice. It doesn't smell that great either... but that has nothing to do with its effectiveness, heh.

Back in 2013 I wrote a review about a beauty blender knockoff as they hit the wider makeup world (which is people like me who are not MUA's and not quite enthusiasts either hah!). In it I linked a video for a recipe to clean your brushes and sponges alike using dish soap and olive oil... it was impressive at the time because I didn't know better, I admit that. Indeed, the combination left a residue that compounded and left the brushes smelling nice, but unable to feather product because of that ickiness that later developed.


Since that revelation, for a couple years now, I've been using a recipe that I found through a youtube MAU named EnKoreMakeup (<---link to video); so far it is the best recipe I've used for cleaning my brushes. It's very effective; gentle even on my kolinsky sables, cheap, and smells quite amazing depending on the dish soap and leave-in conditioner used. I've noticed a significant drop in incidents of skin breakouts since cleaning my makeup brushes with this, so I know its been disinfecting properly-- plus they're always so fluffy and new looking after they're dry.

One batch makes quite a lot, and the ingredients are likely already on hand.

Rubbing Alcohol, dish soap, shampoo/body wash, leave-in conditioner.

Since I've juuust ran out of my spray detangler/leave-in, I used one of my cream/lotion type ones instead. I also substituted the shampoo for this gentle body wash because it smells of roses and my shampoo is tea tree which I am not entirely fond of the smell of, hehe.


I added something a little different to this batch. Since I have a few specialized things because of my soap making supplies, I decided to add in a little pre-mixed fragrance oil especially for these products. I bought this "love spell" mix from Hobby Lobby.

Oils are best added in first to a liquid mixture then the alcohol right after, so that it mixes properly in the solution.
This stuff is potent and it pours out really quick; I didn't know it at the time and it just flowed into my mix too fast for me to really say how much went in lol... so for the batch that EnKore has laid out, I added roughly 15 drops, I think. It's too strong-- oops.

A good rule of thumb with fragrance oils is less is more lol; 3-6 is more than sufficient, and probably better added with a pipette than the dropper it comes with.

Since he didn't lay out a written recipe on his video's description, I will take it upon myself to do it for those that can't for whatever reason view the video-- he states half tbsp, but tsp seemed more accurate:
  • 1 cup of distilled or bottled water
  • 1/4 cup of 90% isopropyl alcohol (a.k.a. rubbing alcohol)
  • 1 1/2 tsp Dish soap
  • 1 1/2 tsp Shampoo
  • 1 1/2 tsp Spray Leave-in Conditioner.
  • *Extra: 3-6 drops fragrance oil for soaps*
*If you're using a fragrance oil, remember to add it in first, then the isopropyl alcohol-- stir till both ingredients are properly combined.
Gently mix the rest of the ingredients, stir, and pour into your bottle. When using the solution, you'll notice this stuff doesn't lather copiously so it goes without saying that you must rinse thoroughly to make sure you've got it all out.

The most effective way of cleaning a brush is to then use a surface other than your hand; things like the brush cleaning mats and mitts all over the market come to mind. I use a little cellulite massager I found on ebay a long time ago now.


Nowadays you can find really cheap brush cleaning surfaces, even DIY ones, just as easily as you would find the beauty blender dupes lol.

My own method of hanging my brushes to dry is less elaborate than some of the DIY's I've seen; fairly indicative that you're dealing with a sewist foremost lol...

Behold, my spare-thread-rack-brush-drying-contraption... heheh!
Took some rubber bands and looped them onto the brushes in a manner that I could then hook them onto the rack.

I don't know if this is the end all be all of cleaning solutions for me, but for the past couple years its been very good and nothing yet has been able to overthrow it.

Sunday, July 10, 2016

Fashioning My Cyber Microcosm: Inside Franken-tailor's Creative Laboratory v3.0

Oh my ghoulish readers, it would appear I am once again packing my creative laboratory after this weeks news; we're moving once more! Except this time is a little different. We're not moving because the mister got a new job at a new park, we're moving because although I much enjoyed having the master bedroom as my lab of creation, the rest of the house was leaving us feeling a little like sardines in a can.
Our new place is definitely an upgrade from our current living situation. More room, newer fixtures, and more importantly-- more sunlight. The only room that received any sunlight in the current home was the master bedroom, and that was the main reason I had my setup there.

The configuration of my lab was my absolute favorite thus far, and it occurred to me that I haven't given a little tour of this version in its peak glory!-- thankfully I took pictures before taking everything down.


When you first walk in, you would have been greeted by the kittles sunbathing and bird-watching/taunting on the ironing station.

My sewing box is a custom paint job
by my friend and artist who runs Myrcury's Toybox

The cutting table is not typically this clean, but it is a bounty of Halloween themed delight in itself! With jack o'lantern note pads, and coffins holding wonderclips, to skeleton hand bowls full of pins-- I love it spooky and cute!

Most of my NBC gear was gifted to me by beloved friends in New Mexico

Turning to the left, we see my book/form corner-- a shelf that is devoted to my sewing and craft related reading material.
On the wall, you see some storage bins where I have placed the overflow of patterns that no longer fit where they're supposed to.
In the middle is a shelf that is meant simply for keeping some of my more decorative items, which works nicely as a prop when taking shots of garments on my form.

Skull painting by yours truly
To the right, skipping over the ironing table (which you can see well enough here-- along with the room as it began coming together), we have plastic bin units which hold the various weights of fusible and non-fusible interfacings on the top 3 tiers. The bottom 3 tiers hold ribbons, and some of the miscellaneous craft tools; those not really sewing related, but don't have a dedicated craft to go into a box, that went into the closet.

The small shelf served to hold my bins of patterns, but since a sudden growth spurt occurred in the subsequent time after this photo, it was roughly half books and half patterns before being packed away.


Heading to the right, again we see another view that's a touch dated, as the pale tv tray is/was no longer there and in its place was a filing cabinet where the bulk of my patterns called home.

I found that large and rather cumbersome wall mounted shelf/cabinet at the thrift store for $3, its former life was to hold mugs and teacups. I found it quite suitable to hold my scissors up and away from traffic and curious paws.
I have plans to hire another artist to custom paint it for me-- I could do it myself, sure, but I consider it a duty to show my love and support to other artists knowing how much I struggled and failed trying to do my own thing.


Finally, we come to the machine corner. Yes, I have a ton of thread as you may have noticed! Clear vinyl covers are in the works to protect them from dust while still maintaining their colorful appeal on display.
The wall shelf isn't holding as much as the first one-- the first tier holds mostly decorative things like my custom MH doll done by Myrcury, my odd sized knitting needles, and a caddy of misc. feet and cams for my singer directly below.
The second tier is more decorations along with two vintage wicker sewing boxes filled with needles and refills for chalks and whatnot.
The very top tier holds my bath and beauty making equipment-- I recently started buying myself the equipment needed to start making soap! I can't wait to do that.

You can also see that I framed the printout made sometime ago. I placed it into a glass frame so that I can write with dry erase markers-- makes it easy to change my ever-changing numbers. One of these days I'll augment the frame to include hooks to hang various things like my measuring tape, and perhaps my sewing queue pattern basket.


A sewing room tour isn't complete without a closeup of the belle of the ball! I am still so crazy proud of this machine-- she's not as pretty as some of her other Singer sisters, but by gods, she's still amazing. She has a cute little pincushion companion that sits so well on her, and never falls off-- it helps that I put a magnet in its bottom after re-stuffing it with sawdust in the process of re-purposing it for a pincushion. Directly next to her is a little coffin caddy I painted myself ; it holds a threader, some snips and the feet I most commonly use, you know, the usual. The little drawer caddy is my own creation, but I hired the talented people over at Geek Goddess Creations to custom paint it. It holds a lot of the little gadgets I have such as bodkins, tracing wheels, and metal templates.

That completes this tour, my ghoulish folks... 
I hope you enjoyed it, as v3.5 is coming soon!

Wednesday, July 6, 2016

Mortem's Tricks or Treats: Perl Not Purl.

We're at the peak of our season here when it's hot... and it's humid... and I'm feeling miserable in this combination-- too much of a desert dweller.
I have been so intolerably moody, that I can't seem to enjoy any of my favorite passed times, and normally when I get this way I just turn to something monotonously crafty, like knitting... except knitting in this weather is the worst and I haven't yet cracked the code on being able to motivate myself to knit during the warm season.

So June 24th was my 28th birthday, and my dear mister brought something to quell the restless dragon with tidings of craft supply. A very smart lad.

He bought me something I have been mentioning I've wanted to try; perler beads! They're simple, they're cheap and offer just the right distraction I needed on such humid and hot days-- just like knitting is for winter and fall days (a very VERY smart lad he is-- snuggles were in order).


He started me off on a variety pack and a set of pegboards. I took to Pinterest for a bit of pinspiration (words, woman, words!), and it became clear that I should be using my knitting and cross stitch patterns, because they are all the same format anyway.


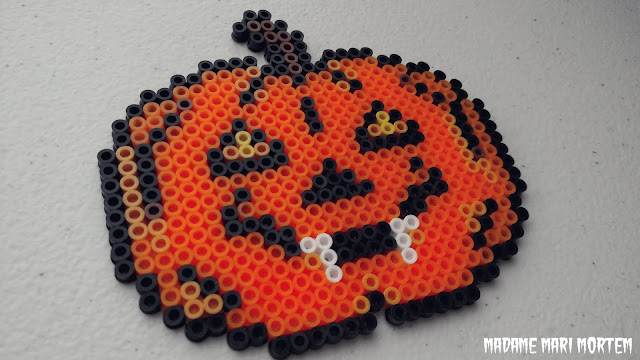
I began simply with a cute little pumpkin that I was going to cross stitch (which was ironically taken off a fusible bead pattern site), but my imagination and creativity started taking flight almost immediately, and it was no longer the same pumpkin that should have been.

Well so much for following patterns...
It's easy and addictive to play with a pattern and let it get away from you when working with perlers, unlike most other times-- probably the reason so many are encouraged to use perlers, young and old.

I saw another project on Pinterest that is old news to others, but to me it was just the cherry to my steadily layering cake: earbud holders.
It opened up worlds to me; so much can be done with Perlers in the hands of a properly motivated mind.

It goes nicely with my wrapped earbuds,
which the bears have since been torn off (intentionally)


It only took two projects for me to realize that I needed something a little more elaborate and challenging.

I remember really wanting a ghost sweater by ASOS, and not being able to find it or a pattern for it, so I sniffed out a free pattern making program site and made my own pattern for a ghosty sweater to knit... that still hasn't been made.... but whatever, this is beside the point.
This wasn't the site I originally found, but it turned out to be just about as good: Pixel-Stitch
The patterns still need a bit of re-tweaking on a photo editing program (my favorite free one is Pixlr), but by jove! Now a way for me to construct the challenge I need.

And of course, I chose the almighty Boris Karloff as our very favorite monster:

Frankenstein's Monster:

Click image for printable.

I have (hopefully) made this public, so that anyone can nab it for any purpose they so choose to use it for; everyone needs a little Karloff in their lives, I'm sure.
My project was coming together, except if I was to embark on a perler portrait project I was going to need more hues and a larger board, and so I fed the beast (usually a bad idea, unless you can afford it) by buying additional supplies during the 4th of July sales at the craft stores (also a bad idea if you treasure your wallets contents)... but like usual, it just wasn't enough! Giving me a reason to go back among the plethora of torturous temptations. I guess it's my own fault though, for deviating from the planned color scheme. I guess for now I'll be playing defense against the kittles, since I have to wait around for more liquid cash to come my way to restock the greens I used up.

Can't even follow my own pattern, as it turns out.
I wondered about the longevity of the pegboards over extended heat exposure-- plastic does have a tendency to, you know, melt. That's what brought me to discover the "masking tape method". I tried it on the earbud holder project, and aside from a little stickiness leftover from the masking tape (which was easily removed with a wet/soapy cloth) it turned out to be just the solution to maintaining an unwarped/melted board.


Now I'm wondering how on earth I'm going to manage taping up Mr. Karloff as big as this piece is turning out, so that he can be ironed... looks can be quite deceiving-- my hands are not as dexterous as they once were.
I envision quite a lot of ranting curses.

Anyway! Because tricks are better accompanied with even more treats, here is a pattern of that simple little pumpkin with that Mortem twist for your beading or needle-craft pleasure (although I am positive you all could have devised it on your own, you crafty ghouls!), but sorry there's no color code on this one-- it was just modified on paint from the original:

Click image for printable.

Spook ya later!
Related Posts Plugin for WordPress, Blogger...