Showing posts with label spooky. Show all posts

Sunday, July 10, 2016

Fashioning My Cyber Microcosm: Inside Franken-tailor's Creative Laboratory v3.0

Oh my ghoulish readers, it would appear I am once again packing my creative laboratory after this weeks news; we're moving once more! Except this time is a little different. We're not moving because the mister got a new job at a new park, we're moving because although I much enjoyed having the master bedroom as my lab of creation, the rest of the house was leaving us feeling a little like sardines in a can.
Our new place is definitely an upgrade from our current living situation. More room, newer fixtures, and more importantly-- more sunlight. The only room that received any sunlight in the current home was the master bedroom, and that was the main reason I had my setup there.

The configuration of my lab was my absolute favorite thus far, and it occurred to me that I haven't given a little tour of this version in its peak glory!-- thankfully I took pictures before taking everything down.


When you first walk in, you would have been greeted by the kittles sunbathing and bird-watching/taunting on the ironing station.

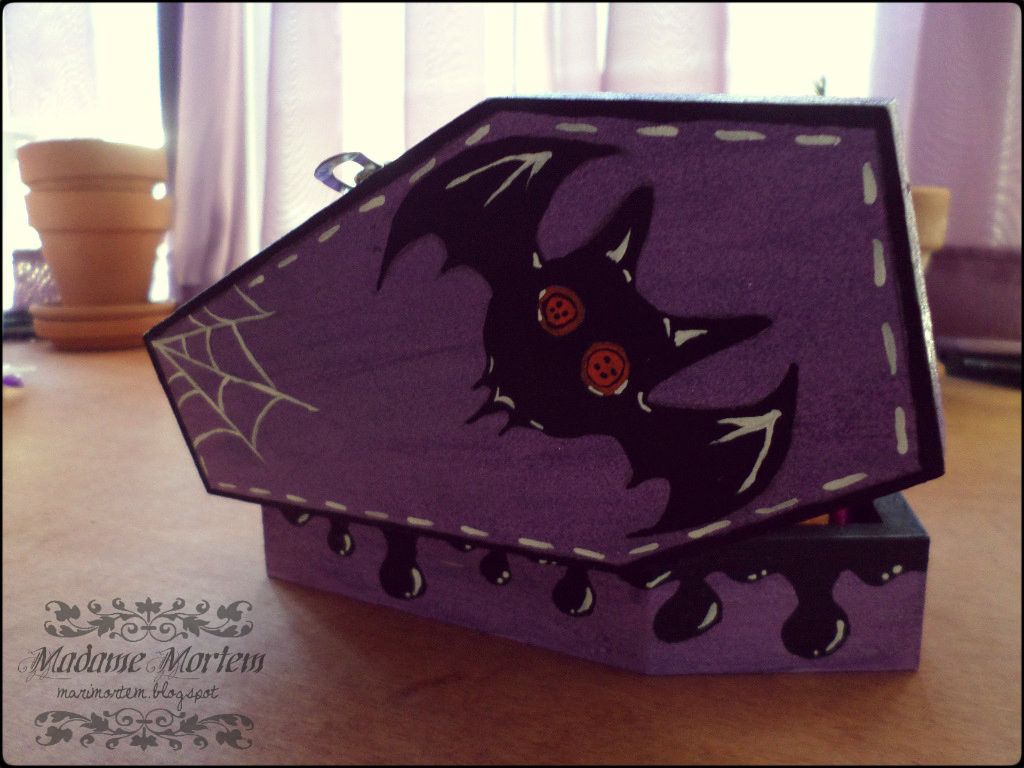
My sewing box is a custom paint job
by my friend and artist who runs Myrcury's Toybox

The cutting table is not typically this clean, but it is a bounty of Halloween themed delight in itself! With jack o'lantern note pads, and coffins holding wonderclips, to skeleton hand bowls full of pins-- I love it spooky and cute!

Most of my NBC gear was gifted to me by beloved friends in New Mexico

Turning to the left, we see my book/form corner-- a shelf that is devoted to my sewing and craft related reading material.
On the wall, you see some storage bins where I have placed the overflow of patterns that no longer fit where they're supposed to.
In the middle is a shelf that is meant simply for keeping some of my more decorative items, which works nicely as a prop when taking shots of garments on my form.

Skull painting by yours truly
To the right, skipping over the ironing table (which you can see well enough here-- along with the room as it began coming together), we have plastic bin units which hold the various weights of fusible and non-fusible interfacings on the top 3 tiers. The bottom 3 tiers hold ribbons, and some of the miscellaneous craft tools; those not really sewing related, but don't have a dedicated craft to go into a box, that went into the closet.

The small shelf served to hold my bins of patterns, but since a sudden growth spurt occurred in the subsequent time after this photo, it was roughly half books and half patterns before being packed away.


Heading to the right, again we see another view that's a touch dated, as the pale tv tray is/was no longer there and in its place was a filing cabinet where the bulk of my patterns called home.

I found that large and rather cumbersome wall mounted shelf/cabinet at the thrift store for $3, its former life was to hold mugs and teacups. I found it quite suitable to hold my scissors up and away from traffic and curious paws.
I have plans to hire another artist to custom paint it for me-- I could do it myself, sure, but I consider it a duty to show my love and support to other artists knowing how much I struggled and failed trying to do my own thing.


Finally, we come to the machine corner. Yes, I have a ton of thread as you may have noticed! Clear vinyl covers are in the works to protect them from dust while still maintaining their colorful appeal on display.
The wall shelf isn't holding as much as the first one-- the first tier holds mostly decorative things like my custom MH doll done by Myrcury, my odd sized knitting needles, and a caddy of misc. feet and cams for my singer directly below.
The second tier is more decorations along with two vintage wicker sewing boxes filled with needles and refills for chalks and whatnot.
The very top tier holds my bath and beauty making equipment-- I recently started buying myself the equipment needed to start making soap! I can't wait to do that.

You can also see that I framed the printout made sometime ago. I placed it into a glass frame so that I can write with dry erase markers-- makes it easy to change my ever-changing numbers. One of these days I'll augment the frame to include hooks to hang various things like my measuring tape, and perhaps my sewing queue pattern basket.


A sewing room tour isn't complete without a closeup of the belle of the ball! I am still so crazy proud of this machine-- she's not as pretty as some of her other Singer sisters, but by gods, she's still amazing. She has a cute little pincushion companion that sits so well on her, and never falls off-- it helps that I put a magnet in its bottom after re-stuffing it with sawdust in the process of re-purposing it for a pincushion. Directly next to her is a little coffin caddy I painted myself ; it holds a threader, some snips and the feet I most commonly use, you know, the usual. The little drawer caddy is my own creation, but I hired the talented people over at Geek Goddess Creations to custom paint it. It holds a lot of the little gadgets I have such as bodkins, tracing wheels, and metal templates.

That completes this tour, my ghoulish folks... 
I hope you enjoyed it, as v3.5 is coming soon!

Wednesday, November 5, 2014

Mortem's Tricks or Treats: Coffin Rests, and Prototype Pumpkins

So, now that you all know I am trying to decorate my creative laboratory around a Halloween theme... I suppose it's time to let you in on all the things I am currently in the process of creating for myself, the self titled Spooky Seamstress-- could be a name for a new blog??

Anyway.

I'm going to post them as I finish them (or in this one case, days after), so I won't make this long... again... it might happen regardless...


This is merely a prototype; I say this because it technically doesn't function as it was meant... but the idea is still materialized... roughly.

BEHOLD!


Normal, and then spookified!

It's a pumpkin pincushion with a bat emery attached to it. I know, it needs work.
It's not actually filled with emery or sawdust, so that's why I said doesn't actually work as per its name...
I repeat, it's a prototype!

When I buy myself some emery and sawdust or crushed walnuts, this little creation might look a lot smoother and will also be a functioning member of my sewing society.

Bonus!

It's not enough to just post one photo... here we go again.
No really, I promise this'll be good.

If you're a sewist like me, then you have a ton of tools right beside your machine that constantly roll off the table. I did have a bowl, but that only worked for so long until I needed to spruce it up, make it spooky.


I had a few of these little wood coffins from Micheal's lying around, and they're just the right size! So a-painting I did go!


Here we have the bunch all together! How lovely. I put a ribbon on the lid to the base to keep the lid looking awesome, because the back (front)...


Has a little bat with button eyes and a web that kinda looks like it turned to stitching... kinda...

But wait! There's more!

It wasn't enough that I had a pumpkin pincushion with bat emery, and a coffin holder!

Nailed it.
I needed a skeleton hand holding it all, too.

Spook ya later!

Sunday, October 14, 2012

Skeleton Closet: Embracing My Inner 'Spooky' Child


In the famous (to me) words of my momma (and probably other mommas too): "One must always expand their horizons because you never know what you'll fall in love with"


Today I was experimenting with color. I bought this shirt during my last trip to Walmart; as you can tell, and probably have seen if any of you ever visit walmart, this shirt is for little girls... I fit little girl's XL, heh.
I bought this along with another ribcage shirt from the boys sections-- I fit a M boys. Both were $4.

Anyway-- this was entirely too cute to pass up, and although I seldom, if ever, wear t-shirts; I am making a huge effort try new things. Since I've been making and buying some great t-shirts, I've been trying to incorporate ways to wear them to suit me, and simultaneously shuffle in some color.

Obviously this shirt doesn't represent my age well, but I figured what the hell, let's embrace that inner spooky child.


Since I've been doing a lot with my make up and hair, I thought that this look might do well with a beehive of sorts; I don't have a ton of experience or tools for hair, so I opted for a faux beehive using the high ponytail method, and topped that off with a bow that is showing up quite often in my outfit posts, hehe.

I took some colors from the palette of the shirt, and used them in my make up. A hot pink, sky blue, and bubble gum purple.

 I used the purple on my bottom lid, and eyebrows to effect. So colorful! Eeep!
Another small indulgence to my inner child would be that of Halloween snow globes... I love collecting them!

$1 each from Dollar Tree
I am such a sucker for Halloween kitsch...

What I'm wearing:

  • T-shirt: Walmart
  • Cardigan: Ardene
  • Skirt: Fairweather
  • Tights: from my mother
  • Necklace & hair bow: self-made


A reminder: Don't forget to enter in my Halloween Giveaway!
Comment on this link to be entered

Related Posts Plugin for WordPress, Blogger...