Showing posts with label sewing notions. Show all posts

Thursday, February 25, 2016

Spooky Basket: Small Solutions, Big Differences.

I know I haven't been sewing much lately, but that doesn't mean the acquisition of new sewing gadgetry has halted. In fact, it would be much the opposite... it seems the amount of buying such finery has reached "plunderer" levels of audacity.

To begin, back when I purchased Ophelia, I had a nagging suspicion that eventually I will either gain lots of weight or sustain it, so I preemptively bought the Fabulous Fit kit along with her. Funny enough, I had lost enough weight after the initial post that I was a "model" 12 all around and sustained it up until this point-- so my pad kit just sat in my closet taking up $75 worth of space (ouch) in the meantime.


"You sure about this, momma?" "Momma, these smell funny"
There was a bit of confusion during the ordering; choosing the size for the dress form, because some people say get it according to how much you want to increase and the box says to get it according to the dress form you currently have... the former sounds more correct to me from the perspective of increasing to get to a certain size. I don't know, but in the end I took my advice from those who've tried it... and it still ended up being the one recommended on the box: I have a size 12 dress form, and I needed to increase below the waist up to a 16-18, so a size medium set of pads is what I purchased.


Let me just state that you need a partner and at least an hour and a half to play around with these pads... because they can so very easily go awry with the wrong measurements and a biased perspective. I learned that I thought my butt sat a little higher and a little bigger than Ophelia's: this was not the case, though I wished it was ahahah! I thought the front of my thighs were a little larger, also turned out not to be true. The only thing that my eyes saw correctly was my stomach pouch, or what I like to call the "fanny pack".


It turned out to be the only pad I needed to place onto Ophelia, fancy that. Seems like a waist of a nice kit (*rim shot*), but if it'll get me the right fit I'm happy. These pads seem generally very handy should I ever have the need to custom fit someone else, so I am not entirely critical on myself for having spent the money on this pad set that I don't think I will ever use in its entirety for myself. Honestly, though... if I didn't see future use besides fitting me alone, I would have just given her the ol' Frankiestein mod job.

Take from my experience what you will, but I say if you've never found a dress form that fit at all right and your fit issues are quite extensive, then this is a great set for you to address it all on any dress form you have-- it even fixes some vertical fit issues like high or low bust line points and dowager's hump for example. For people with average body sizes like myself, that your variations are only inches apart from the form but everything sits relatively in the right places, best just to stick with padding your form up with batting, because it's still accurate but vastly cheaper.

Next items are pattern material and a roll-a-pattern rotary marker.


The usefulness in these is appreciated by those, like myself, who find the idea of cutting into master patterns shuddersome-- if you're cutting at a small(er) size, the larger sizes go to waste. Sure you might've only paid a dollar, maybe even less... eventually there will come a time when you no longer want that pattern and you could pass it on in pristine condition; one day it too will be considered vintage! Not just that though, no one ever stays the same size throughout their lifetime... but a favorite pattern might remain a favorite decades later, so it's nice to be able to accommodate for any changes easier with the range of sizes available on the pattern.

Anywho *steps off soap box*.
I purchased these from Nancy's Notions as a bundle here, and it is about the only place I know that offers a decent amount of pattern material with a handy marker tool for such a great price. Most other places offer the material by the yard/meter or in 25 to 50 yard bolts for exorbitant amounts.
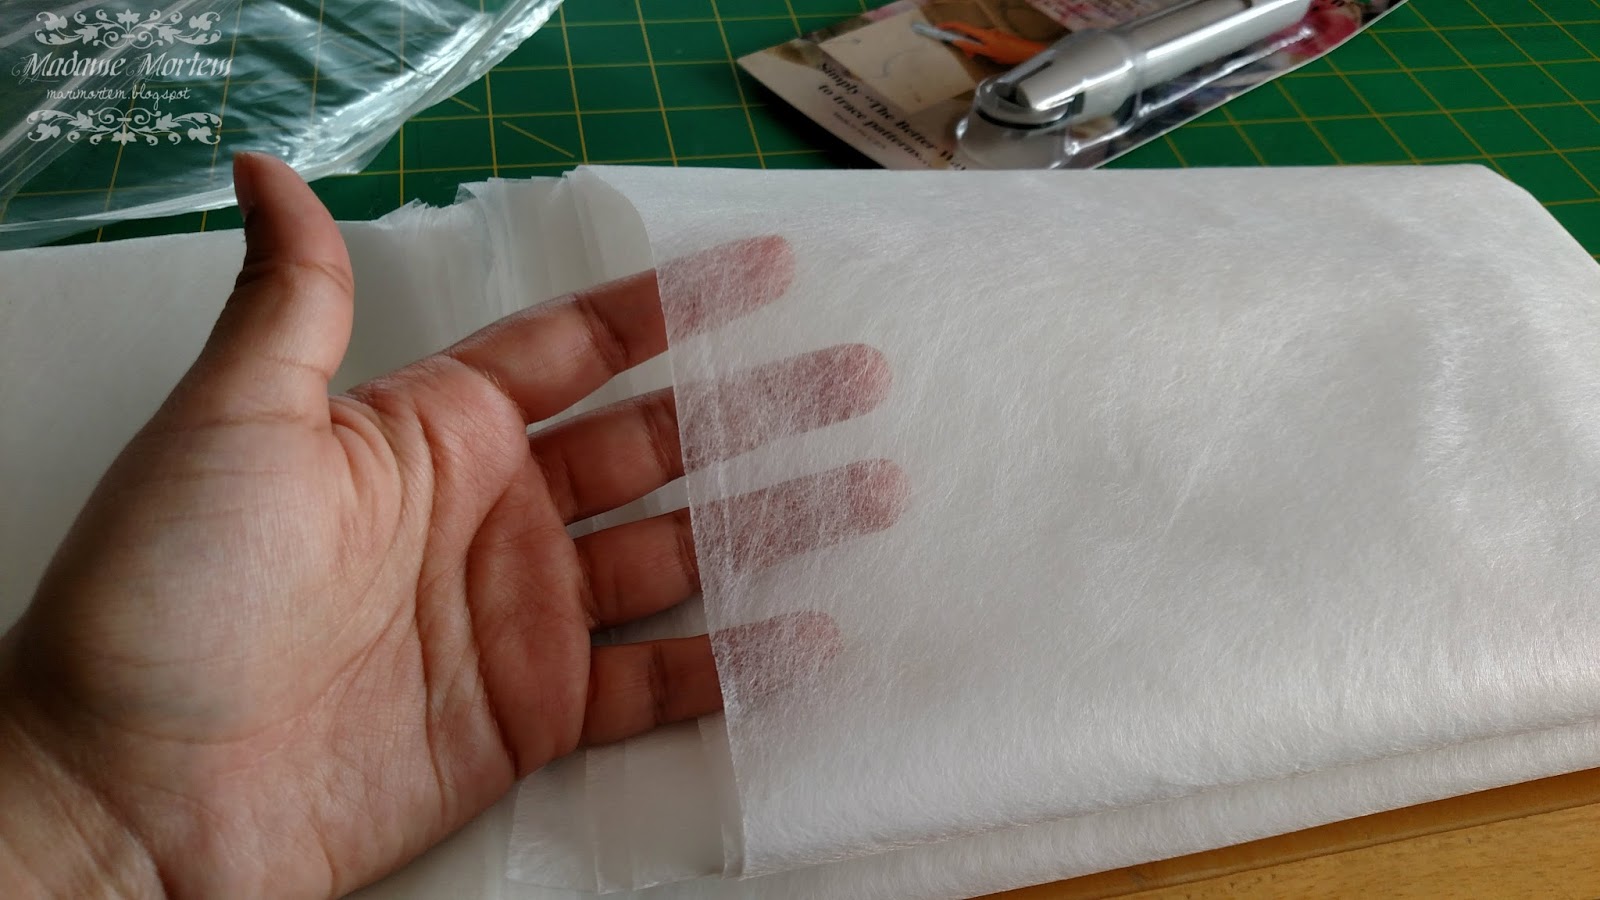


Seems like the kind of thing that should be even cheaper than muslin and even batting, and yet it isn't in most cases for whatever reason. It isn't stronger than muslin, it's more like dryer sheet material though it is still strong enough to endure some pretty rough handling and pinning heaps better than paper tissue in comparison; it is still see through for the purposes of copying a pattern with much less hassle than using a tracing wheel with transfer paper onto muslin. I now use this for my final drafts after I finish all revisions from my master patterns, but will continue to use cheap gift tissue paper during the redraft/redesign process since it would not be nice to waste this material, hehe.

I haven't "officially" used the rotary marker, though it seems like a pretty ingenious little trinket.


I like that they made it refillable, because I would hate for this entire hunk of plastic to be disposable-- though I got the very bottom of the marker bit off and revealed the felted ink well bit inside, so I wonder about the possibility of "filling" it back up with ink when the time comes to replace it.
I have played with it a bit on a pad of paper, and its got a very gentle flow of ink, doesn't need much pressure to get a very crisp black line; I worry that the ink will bleed onto the master pattern with such thin pattern material, which is why I haven't actually used it yet... though that could be because it's still so fresh from the box. That could change as it begins to run/dry out.

Next items are the notions that just didn't make my cut; I tried and tried and they just don't deliver for me.


It looks like three but it's really two and a half.
The bottle of fluid and "pen" is a fabric folding pen by Clover; it claims to do precisely its namesake... fold fabric (without the need of an iron).

I read and reread the instructions, looked at different online video demonstrations but none of it seemed to make this pen and its fluid work, and I wasn't using anything too different from cotton. Maybe my batch of folding fluid is faulty or maybe it's just that it only works on cotton and cotton blends, heh.

Next is another Clover item, which disappoints me because I am typically a fan of anything from Clover. This one is even on Nancy's top 10 notions list! It's the Clover desk needle threader. I have a vintage one I bought from the thrift store oh so many years ago, but it's green and this is purple... and you know me when it comes to purple tools!
Later I find out the brand of the original threader I have still exists in some shops and even comes in purple! Here. Seems like a hefty price to pay for a simple needle threader that I already have, but I live by my 1950's INFILA... it would great to have it in purple, haha!

Unfortunately, this Clover one is more trouble than its color is worth. It doesn't give me a range of needles to thread unlike the INFILA; larger than a size 5 sharp doesn't even fit into the slot. On top of that it only threads oval eyes, which is fairly typical for hand sewing needles, but there are round ones out there and on the off chance I get them I want to be able to thread them quickly too, heh.
I like using Bohin's size 8 sharps for my basting and hand stitching which seems just small enough that it doesn't always catch and thread that needle in a jiffy. The range seems to be between sizes 5 and 7. For how much it costs, it's not worth it at all unless of course you stick strictly to the sizes it can thread, as someone who has a wide range of needles for various purposes it just doesn't cut it... but it's cute nevertheless.

I really did want these to work because I like the idea of them quite a bit and would definitely use them if they worked as advertised and/or had a wider range of use.

Till next time, my ghouls!


Thursday, June 4, 2015

Spooky Basket: Oddball Sewing Essentials.


The list of sewing essentials will differ from sewist to sewist. I have personally made lists for notions you can make, notions you can buy (here and here), and notions that I've thrifted.

Lists are fun to make-- especially sewing related lists.

I also understand that most of my lists comprise of items that are typically not in everyone's budget at the start, and in the best of cases not exactly "essential" (but really, if you had the chance, you should buy them because they do make life so much easier).

When I first began sewing, and I mean seriously about it, my sewing box had some oddball things I had reclaimed for the purposes I needed in order to get my sewing done.

Sewing is funny that way; you think you'll never see a need for something until you actually come upon the circumstance which simultaneously gives you that ahh-ha and aww-darn, gleaning to the ohhh hey moment.

The sewing stiletto.

Marti Michell
You've probably seen various types of stiletto awls, from the recent bamboo variants to the mother of peal handled antiquarian commodities. I first found its use when I began working with tiny/fiddly seams that required a close encounter with the needle and my finger-- like those found when working with lightweight wovens that you can't exactly iron without ruining.

To this day, I have not given up the convenience and price of a manicure orange stick. These are literally available in any dollar store in the world, and the added bonus (a recent revelation, thanks to pinterest) of potentially having toe separators that I use to store bobbins.

Sewing Machine Cleaning Kits.


Amazon.com
Most universal cleaning kits will look like the ones above-- they'll have some machine oil, some screwdrivers and a basic stiff brush.
Since a sewing machine has more tight crannies than a natural cave, this just isn't enough. Eventually dust and fluff will accumulate in the deeper crevices where you can't really reach with the basic tools, effectively lowering your machines efficiency... it might even break, and you might assume its the quality of the machine when that might not be the case.

Included with my basic cleaning gear my cleaning kit has:

  • A feather powder brush (mine came with shimmer powder from Quo makeup)
  • A head lamp 
  • A dental pick set
  • A spoolie brush
  • Microfiber lens cloth


It's difficult to locate an exact source for the feather powder brush with the thin pliable shaft I have, but it looks just like this and is of the utmost use when cleaning out a machine that cannot be sprayed with canned air.

Anna Sui
It appears Anna Sui once made one called the 'Finishing Brush' but has since been discontinued. A fingerprint brush might work well, but I have never tried it.

A headlamp is another essential tool for cleaning because your machine should obviously be off when you're digging around inside, but it's a little cumbersome trying to angle a lamp or juggle a flash light in such a situation; it wouldn't be a hard to see area if light were able to reach all spots of a machines innards easily.

The dental pick set is great to reach in even harder and more delicate areas of your machine; I use the scaler to grab little lumps of oily lint, and the mirror to guide me around. I found my set at the dollar store, it included a tooth brush which I also use for cleaning mucky gears.

I use a spoolie brush for areas that need all around cleaning with very little side to side movement, such as the bobbin race.

Lastly the microfiber lens cloth, because it doesn't leave lint behind like a regular cloth. Heh. I get one free every time I get a new pair of glasses.


Pattern Paper.


Amazon
This is one I am always asked about, and I am honestly shocked every time it happens; where do I get my pattern paper?
It would be nice if I could afford yards and yards of the stuff with grids and dots on it, but I waste and use so much of it I have to turn to more economical choices.
I use simple and plain white gift tissue, meticulously glued together with an equally plain glue stick. Seriously.

Since I never cut into a purchased pattern, I make a point to copy it onto tissue paper-- the tissue paper also makes it easier when you're making adjustments of the pattern pinned onto yourself or your form, or you're turning it into a sloper. Once my adjustments have been made, and I consider the pattern tried and true, I glue the altered piece onto thicker paper with a spray on glue for continuous use and abuse. I get my tissue paper at the dollar store, and I had purchased a large roll of butcher's paper from some supply market that has so far lasted me going onto 2 years now. It's very very cheap, so I don't feel bad if I mess up.

Ok so my list isn't that odd or even that exciting... if not for the fact that so few of the ladies I encounter at the fabric shop realize these little tidbits, you might even call them simple.

Share some of your own "reclaimed" sewing essentials in the comments!

Friday, April 3, 2015

Spooky Basket: The Girl Who Wanted Everything.

My husband jokes that I am the girl who wants everything, because of my seemingly perpetual avidity for little trinkets and gadgets, patterns, fabric and shoes.

And you know what? I do want a lot. I want all the time... and there are times when I wish I could really just stop it. Like the past two pay checks.

I end up with a yard or two of fabric coming home from work, or an expected delivery of a couple items I have ordered in the previous weeks...
Now normally, buckling under my avarice wouldn't be so bad, because if it wasn't for recent news of another potential move, the money is technically disposable-- all our bills and obligations are paid up. I am supposed to be saving up in case this move does indeed happen... but I am finding it particularly difficult, especially when it's sitting right in front of me and all I need to do is pull the proverbial trigger.

"I'm trying, Ringo. I'm trying really hard to be the Shepard..."
And so I am stuck wishing, and listing those wishes instead.

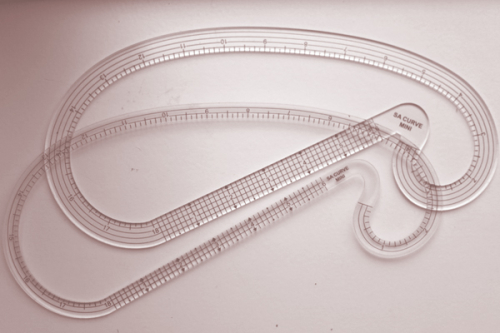
1. SA Curve Rulers by SA Curve.

Image source: Style Solution. Buying Page: Amazon.com
I try and keep myself apprised of any new sewing toy on the market, frequently spending a couple hours a day browsing all my venues such as Nancy's Notions, Ebay, and other such places. However, these managed to sneak underneath my radar just long enough that I am only recently finding out about the company. Unfortunately, the company's products are becoming a little scarce with very few places that actually carry their humble full range of neat and handy products.

These SA curves allow you to mark in your seam allowance with much ease-- each ruler is designed with common seam allowance widths, so that all you would need to do is line up the curve to the pattern and mark a full line in one swipe-- instead of the whole connect the dots dance one would with a gauge. They come in 3/8"ths, 5/8"ths, and 1/2". 

2. EZ Templates by SA Curve

EZ Shirtmaker: Source

These metal templates that at one point SA Curve sold are/were considerably larger than most templates in the mainstream market-- i.e. Clover or Dritz.

EZ Pocket: Source.

I suspect these to be exponentially more useful and practical, not only for their intended purpose, but for many other purposes aside garment making because of their larger sizing. Again, though... a little scarce, and when you do manage to find a vendor, they're a little more price inflated than when the company sold their wares on Etsy (which no longer exists on there).

3. Measuring Wheel.

Source: Amazon.com
Although SA Curve at one point produced these, they're even harder to nab than the previous two. Luckily, Kawaguchi, a company from Japan, has a very similar tool, sans the handle with a grid ruler and a clear body that doubled its usefulness. The primary use of this tool is to measure curves when accuracy is of utmost importance; for example, to measure an armhole to either add or remove ease from a sleeve to achieve a cleaner more tailored set in.

4. Clover Mini Iron II /w Adapter Set

Source: Amazon.com
This is quite handy for a number of reasons, most notably that it's really great for the really fiddly small seams like those in collars, some handbags, and accessories. I do have a smaller iron that gets pretty dang hot, but it's like a travel iron more than a detail iron. I imagine using this while at my cutting table piecing together patterns quickly before I head to my machines, or adding a quick strip of stitch witchery. Some things that need to be ironed, are not worth firing up the larger iron for, but they still need to be ironed...

5. Pattern "Shape" Weights

Source: Nancy's Notions

I prefer using my rotary blades and pattern weights when it comes to cutting out patterns. It's all about accuracy for me. However, one problem I find with run off the mill pattern weights, as well as handmade ones, is that they don't really give you the option of contouring to the curves in patterns, so nicks and cuts into my patterns is a fairly regular thing because the paper is not held down throughout the curve. I have an 18mm rotary cutter in order to alleviate some of the cut-ins, but it's still not quite enough. I bet with these my pattern pieces would last me a lot longer and my pieces more precise!

6. Darning Tools

Source: Amazon.com
It's a little shocking that I don't have a darning egg or mushroom. It's never been at the highest priority for me, mostly because... well... I use burned out light bulbs when I do need to darn a hole. Darning is a method of repairing a hole in a knit article-- a pretty good skill to have, especially as a knitter with cats that like to chew holes in your knitted projects.


And here's where I'll stop for now. 
I hope you discovered some new items to add your own lists! 


Saturday, February 8, 2014

Spooky Basket: Things Synonymous With 'Awesome'

I'd like to confess something:
I have a bit of a fetish.

A foot fetish.
(que dramatic music).

Not the typical fetish you see... I'm in love with presser feet.

There are a myriad of presser feet for a plethora of applications-- it's liable to make your head spin!
I found it incredibly irksome that my machine only came with 6 (6 is honestly quite a lot...). I needed them all, even if the probability of me using each one is really low in the grand scheme of my sewing necessities.

Last month, my brother-in-law gave me money for a late Christmas present, and because my wishlist was rather barren from Nov. and Dec. rush of gifts (spoiled rotten), I knew exactly where to use it...


That's right, a 32 piece set and a little walking/even feed foot on the side! It just came in yesterday, and let me tell ya, that wait felt like forever-- I was that excited. Hell I even doodled my excitement into another piece to hang in my sewing room, hehe...

Can't seem to stop drawing banners in my doodles these days...

I bought the 32 piece off ebay from a vendor whom I shopped with before: Windylegend. I like them a lot; they're always reliable, affordable, their products are always spot on to what they described, and they give you a tracking number that actually works. They all snap beautifully into the ankle of my brother SE 400. I haven't given them all a test sew yet, but the few that I have (cording, rolled hems and low shank zipper foot) work just as intended.


Now, for the walking/even feed foot, I went with another vendor on ebay; 99hk. I am always a little wary with new people I shop from, but it turned out to be yet another really good vendor that offered the same as Windylegend; tracking number, spot on description and pictures, etc.


 It's completely worth it to have this strange and complicated looking foot; it works very similar to that of the walking foot on an industrial... only you don't get the torque and differential feed of the actual industrial.
Anyway, point being, this thing is invaluable with multiple layers that you either can't pin or clip together, but need to keep the layers together as accurately as possible under the capabilities of a household machine. I also took this little guy for a spin, and it worked amazingly to sew a rather thick case for my neighbor's external hard drive without any fidgeting about on the feed dogs (2 internal layers of wool felt, and 1 quilting cotton exterior).

Maybe some day I'll get into the specific functions of each foot, but not today-- the function of the even feed is enough... that's a lot of territory to cover, and I need time to prep! Heh.

Moving on, I took it upon myself to create two costumes for a friend attending the Calgary Comic Expo (which I desperately wish I could attend, as well). Then discovering, upon my visit home, that the drafting tools I had left behind had rusted or somehow broke...

It was a fairly devastating and desperate situation.
So, I have made the checklist of items I lost, and have begun searching deals for their immediate acquisition... I took on more freelance work, so it's kind of important that I get it all again, heh.

I do most of my searching on ebay, and why not, deals are abundant there... and that's exactly where I found this little set; from the vendor Sharpsewing.

Left to right: pattern notcher, awl, needle point pattern wheel
Since I've already finished the first draft of one costume, I'll be discussing the uses for each of these tools in that coming post. For now I bequeath the deal unto anyone seeking decent affordable tools for drafting. Mine did come with a tape measure, in case you're wondering where it is in my set.

Last, but definitely not least...

The ever beautiful, Homepro LR by American Tag. Sadly, it was discontinued and ripped from every imaginable retail shelf, and naturally, became an item of great desire among sewists.

Purple and cast iron-- is there a better combination? I think not.

It's a grommet/eyelet/rivet/nailhead/rhinestone/snap setter. It's nigh impossible to find a setter that has that amount of space in the "mouth"-- it's where it gets the 'LR' in its name (Long Reach). My youngest brother snatched it up for me on ebay, and it included a treasure trove of different bits, grommets and eyelets. It was quite a catch.


 I managed to track down and buy the remaining bits for its other applications, so it's technically as complete as it could be... well, minus the elusive carrying case it was once sold with. It was pretty ugly and didn't match the homepro in the least, anyhow. I haven't really got a chance to use it on real time projects, just testing purposes... but so far, it's everything the hype promised.

Bonus!

I made an impulse buy...
I know, surprise surprise.

Thinking about the dusty purple damask chenille I left behind, I decided I better decide quickly (lol) about what I intend to make once the desire becomes too much to hold back.

Target style: View B


Yeah, it's another pattern. Hey! I'm building a nice collection here *wink*.

I want to make the base the main view of these options; view B (minus that awkward chunk of faux fur they call a collar). Of course, I'll be adding alterations Ã  la mortem.
I'm really thrilled with my choice! Because if I let myself mull for too long, and I purchase the fabric, I would get to the point where I'd be too afraid to cut into it... and that would be a damn shame.


Man oh man, I have so many things to work/budget/plan on now-- I'm extremely thrilled to be such a busy body!

"Shop smart, shop S Mart!"

Thursday, January 16, 2014

Spooky Basket: One Person's Junk...

Besides spending time with my clan, one of my favorite things about visiting my hometown is the sheer amount of seamstress-y treasures one can find in some of the thrift stores.
It usually isn't a bountiful catch, as far as sewing related goodies goes... but this time was different.
This time I hit the mother load, and I'm oh so excited to show it off. Of course, I would be remiss if didn't include the explanation of their uses, for those that wonder why and how...


So lets get on with it, shall we? I bought the two bundle of goodies from my favorite thrift store, as I never fail to find something I absolutely treasure; like vintage and new sewing books!

The Singer Skirt Marker


As you might've guessed from the name, this tall drink of water is used to mark hems around pants or skirts precisely, when no one is around to lend you a hand or when simply grabbing a regular ruler and marking out is just not enough to even out an uneven hemline. The ones made today are made of plastic and very often break after enough use. The vintage ones (70's and down), however, had a heavy metal base and a wooden yard/meter stick with a powder puffer attached to it... they are still going strong, and are far more coveted than the "updates". As such, on ebay/etsy they average about $15.00 to $30.00, depending on how complete they are-- powder puffer and box is what is usually missing.
I found mine complete for $1.00!

The Sleeve Board


Once again, an obvious one as I'm sure many momma's had it in the laundry room. Identical use to the seam sausage (or seam roll as it is commonly known), this tool is used to iron or press tricky long things like sleeves and pant legs. Wooden or professional sleeve boards are used with both sides; one side is smaller than the other; the wider side for pants, the narrow for sleeves. Unlike the seam sausage, however, it creates a flat press or ironed crease (like the ones in the front part of dress pants), so it's not quite as handy to press the cuff of puff sleeves for example. The regular house hold ones are made of metal and fold up, so they don't have the two varying sides to them.
Mine was purchased incomplete and a little on the dirty side; it doesn't have the thermal covering pads they usually come with, but I can sew those easily. I paid just $1.00, when they average about the same as the skirt marker on ebay and etsy.

The Clapper

This device comes in two kinds, one with a point press (as you can see by my old one), and the one shown above. The one and only purpose it serves is to reduce bulk in seams, such as in the sewing of coats and jackets. The seam is steamed, and then this is quickly applied on top of the seam with a bit of pressure-- in light to medium fabrics, it helps to make the piece as flat as a piece of paper. The points on the ones with a point press are used to press out tricky pointy corners, such as those found in collars. Averaging price is once again as the items above, I purchased mine for merely 50 cents; it was a little damaged, which my dearest younger brother sanded away for me. Now it's good as new!

Tailor's board

The gem of my haul-- this is a tailor's board. Before this, I owned the so-called "new and improved" Dritz tailor board, which receives a thumbs down from me (review here). A tailor's board is used to press awkward seams-- like it says, simply fit the seam to any of its various points and curves. I primarily use a tailor's board to press princess seams, as the top curve has just the right amount of bowing for the purpose.
This also has a point, just like a point press clapper-- so it's redundant to own both for that sole use, but you'd never just buy a tailor's board for a singular and specific purpose as that. They're terribly pricey, retailing about $50 and averaging $20 to $60 on etsy and ebay... it's not easy to get your hands on one that is cheaper, so when I saw this selling for 50 cents... I almost puked rainbows of happiness.

Vintage Pincushion


This one need no explanation, as it's the proverbial symbol that equates to sewing, but the sheer uniqueness of it warrants a singular mention; the pincushion. But this ain't no regular pincushion...
Because of the antique nature of this item, it's hard to find even an average of how much it would actually sell for. Anything similar ranges from $30 to as much as $100... but I didn't even pay $10, nope. I paid 75 cents-- and it even has the thread conditioner wax still intact! It was missing a couple pegs, which I and my youngest brother fixed and replaced... can you tell which ones? Heh.

Styling Curve (Vary form)


This handy ruler is especially useful for the drafting process, such as creating even curves on special long seams, such as those in the bodices of dresses from armhole to hip.
I purchased a large one during my early Christmas binge during black Friday. But this one is longer, and was a lot cheaper too; 75 cents as opposed to whatever discounted price I got the other one for (I think $7... I can't recall).

Loop Turner & Wrist Pincushion


The wrist pincushion is once again one of those self explanatory things, but the loop turner sometimes confuses beginners. The slender shape is used to feed through strips of sewn fabric, and the hook at the end latches onto the other side. You then pull the loop at the one end to turn the strip right side out-- very handy with strips that are too small to flip on your own, such as the creation of spaghetti straps. These are cheap to purchase new, but still not as cheap as 50 and 25 cents.

Well, that concludes any necessary explanations; the rest of the goodies speak for themselves

One of three sewing books I purchased for a measly $1.00 a piece (other two are still on their way in packages I mailed to myself), I think this was the rarest of the 3. Though not that rare, it's still hard to find for less than $30.00. Definitely not one for beginners, despite what the title may entail.
It is a wealth of information for such a thin book-- it's certainly a good start when you're endeavoring into flat pattern drafting for the first time (I would say an intermediate to advanced sewist will understand how to use this book). Mine even came with the original ruler, which isn't easy at all to obtain.


Another few items I relished in digging through was the myriad of patterns they had for 25 cents a pop. I found the sewing room accessory one I've been coveting; it isn't vintage, but is out of print. I also found an actual vintage one; I got it because it just oozed vintage charm. Best of all, they're all complete, albeit in a little rough condition.


I don't think the people pricing these items knew what they were selling, or I think they might've charged more... I guess that is what makes it my favorite thrift store! Heheh-- I never leave empty handed, or in the least bit broke.

BONUS:

It came along with my bundle of goods sent to me from back home, and it includes another of the three books I found at the thrift store that is a for real gem for the beginner pattern drafter. This one is the real deal, here. This one is my favorite of all time


Crazy that my copy once again came fully complete. It has instructions for many basic patterns offered in a way that is easy to follow and produces a fine sloper.

What was the greatest treasure you've bought or found?

Monday, April 29, 2013

Mortem's Tricks or Treats: Mortem's Favorite DIY Notion Links

There are certain tools that are essential when it comes to endeavoring into garment construction.
Over the years I've learned that some things are just too important to get into the habit of using and doing, than to progressively invest in them over time. The thing about garment construction is that it's face value is pretty much how it always is; you either don't like the idea of spending hours fussing at the machine and ironing board, or you're really passionate about it. I would lump "casual" sewists into the latter because lots of love and time was spent getting to that point-- even if you feel like you can only make skirts.

The price of these particular tools are exorbitant-- vintage, used or new; it's enough to put off the novice into thinking it isn't a vital tool to have. What's more, with the lack of quality inherent in the market, it is in fact cheaper in the long run to DIY; as an individual you're able to learn from your mistakes and transcend them, whereas the quality of store bought usually tends to remain stagnant for long periods of time.

Here is a brief list (I could go on forever about essential items) of some basic tools you simply should not be without for sewing clothing-- and the best links on how to make them yourself:


  • Pattern Weights: One of the things I commonly find is that many teachers hammer in the idea of using pins in sewing. Pins are good, mind you, but not for everything in sewing... a good example of where not to use pins is pattern cutting-- enter pattern weights. These heavy little bundles of nifty keep the pattern and fabric together quite flat and accurate; I love to use my rotary cutter and mat as I find it the most precise way of cutting out patterns. If you don't have a cutting mat, than simply trace with marking chalk then cut it out with shears.                   
Woman of 1000 hobbies Instrutables
The only thing I would add to this tutorial is more washers to each bundle for more weight; hot glue them together and proceed as written.
  • Wrist Pincushion: Before I figured out I needed one of these, I had been jumping back and forth to my pin bowls; the one by my machine, and the one at my table; going to refill one from the other. Once I had my dressform, it was more of a pain to reach out for pins.
Ruffles & Stuff + Tea Rose Home
  • Pressing Equipment: pressing and ironing is to sewing as heat is to cooking. If you're not doing them together then chances are you're not achieving the greatest results. They say that you spend as much time at the ironing station as you would at the sewing machine; I find this to be an unequivocal truth-- and the right equipment for the job makes all the difference.
Tilly & The Buttons Tutorial

Tailor's Ham:
a fundamental tool for pressing darts of all kinds-- how can you ever sew a garment without one?! The ones that dritz make are very run off the mill and affordable, but they tend to fall apart not too far along-- so in reality you'll end up having to buy more, meaning you'll have to spend more. The pattern also comes with a contoured ham, which helps with rounded seams. You'll need a ham holder to go with the ham; you might find that they're more expensive than the hams themselves, but a great and almost-always-inexpensive alternative is a football kicking tee.
Seam Roll: Perfect for pressing long or tricky round seams, like in pant legs or cuffs. Dritz also makes one, but has the same pro's and con's as their ham.

The Curious Kiwi
 Tailor's Board: Probably the most intimidating pressing tool is the tailor's board. This tricky looking piece of jumbled wood is probably the best item you could have in your arsenal-- it gets to the even trickier parts of garments such as pointed collars and highly curvaceous seams. Dritz makes one that has an integrated clapper that I currently own, but sadly it's quite pricey-- truth be told I am not entirely in love with it either. I'm hoping one day I can make my own clapper and board separately and from more quality and heavier wood.

 Sleeve Board; This has one use that you can probably guess-- yup, sleeves. You can press the entire length of a sleeve on this baby without worrying about leaving leftover creases. This blogger also offers an alternative template/pattern for the tailor's board.
The Curious Kiwi
Don't forget about the importance of pressing cloths to go with your newly made pressing equipment! Uncolored silk organza, and 100% plain uncolored cotton are the best to get; high temperature tolerant and not at all abrasive to even the most delicate fabrics-- the organza allows you to see through to your work being pressed, and won't leave a shine. An added tidbit; if you find yourself wondering where on earth you might find solid wood sawdust, there is another equally good product, albeit pricier than sawdust; ground walnut shells, which is commonly used for iguana bedding-- crafters also use it for filling pincusions!

  •  Dressform: An invaluable tool, but also can be quite a pain finding the most accurate one for less than the price of your eyeballs. There is the commonly known duct-tape version, which I have had very lumpy and flimsy results with... then there's the brown paper tape method. It doesn't lose quite as much shape after it's dried and ready to come off.
    Threads Magazine Tutorial
 Although finding paper tape proved to be the most tedious task. This article also happens to have alternative DIY dressforms with a tutorial on making your own dressform stand. I'd still stuff the form once it's finished, FYI. Side-note, the magazine itself is a fine morning read. 
Update 05/04/2013: I found this blogger via the Threads comments who has shared in depth the casting method of making a dressform, which also includes instructions to create an adjustable stand to go with it. Casting yourself seems like a much more accurate way of acquiring your true "double"; I have a strong itch to try it! Go see for yourself at LULUSHION.

I realize that the tailor's board and sleeve board DIY may not be a viable choice for everyone; it wasn't for me, since I don't have the tools to make them... I ended up couponing my own tailor's board from Joann's, and found my sleeve board for .25 cents at the thrift store; I don't presume to know if the shops and sales are quite the same elsewhere in the world, so I can't say waiting for coupons are viable as well. My hope is that somehow more options have been realized, and that starting up good garment sewing habits doesn't have to be a totally arduous endeavor, and can actually turn out quite fun and inspirational little sewing room equipment. I plan to write up my own tutorials, reviews and tips about sewing notions in the future.

Happy crafting!


Related Posts Plugin for WordPress, Blogger...