Friday, April 3, 2015

Spooky Basket: The Girl Who Wanted Everything.

My husband jokes that I am the girl who wants everything, because of my seemingly perpetual avidity for little trinkets and gadgets, patterns, fabric and shoes.

And you know what? I do want a lot. I want all the time... and there are times when I wish I could really just stop it. Like the past two pay checks.

I end up with a yard or two of fabric coming home from work, or an expected delivery of a couple items I have ordered in the previous weeks...
Now normally, buckling under my avarice wouldn't be so bad, because if it wasn't for recent news of another potential move, the money is technically disposable-- all our bills and obligations are paid up. I am supposed to be saving up in case this move does indeed happen... but I am finding it particularly difficult, especially when it's sitting right in front of me and all I need to do is pull the proverbial trigger.

"I'm trying, Ringo. I'm trying really hard to be the Shepard..."
And so I am stuck wishing, and listing those wishes instead.

1. SA Curve Rulers by SA Curve.

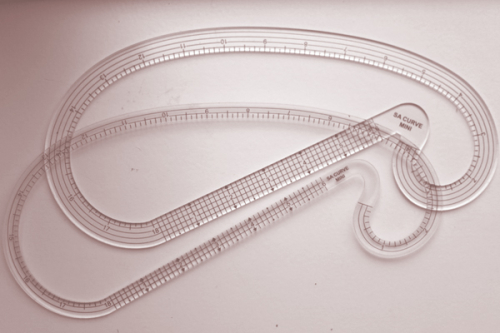
Image source: Style Solution. Buying Page: Amazon.com
I try and keep myself apprised of any new sewing toy on the market, frequently spending a couple hours a day browsing all my venues such as Nancy's Notions, Ebay, and other such places. However, these managed to sneak underneath my radar just long enough that I am only recently finding out about the company. Unfortunately, the company's products are becoming a little scarce with very few places that actually carry their humble full range of neat and handy products.

These SA curves allow you to mark in your seam allowance with much ease-- each ruler is designed with common seam allowance widths, so that all you would need to do is line up the curve to the pattern and mark a full line in one swipe-- instead of the whole connect the dots dance one would with a gauge. They come in 3/8"ths, 5/8"ths, and 1/2". 

2. EZ Templates by SA Curve

EZ Shirtmaker: Source

These metal templates that at one point SA Curve sold are/were considerably larger than most templates in the mainstream market-- i.e. Clover or Dritz.

EZ Pocket: Source.

I suspect these to be exponentially more useful and practical, not only for their intended purpose, but for many other purposes aside garment making because of their larger sizing. Again, though... a little scarce, and when you do manage to find a vendor, they're a little more price inflated than when the company sold their wares on Etsy (which no longer exists on there).

3. Measuring Wheel.

Source: Amazon.com
Although SA Curve at one point produced these, they're even harder to nab than the previous two. Luckily, Kawaguchi, a company from Japan, has a very similar tool, sans the handle with a grid ruler and a clear body that doubled its usefulness. The primary use of this tool is to measure curves when accuracy is of utmost importance; for example, to measure an armhole to either add or remove ease from a sleeve to achieve a cleaner more tailored set in.

4. Clover Mini Iron II /w Adapter Set

Source: Amazon.com
This is quite handy for a number of reasons, most notably that it's really great for the really fiddly small seams like those in collars, some handbags, and accessories. I do have a smaller iron that gets pretty dang hot, but it's like a travel iron more than a detail iron. I imagine using this while at my cutting table piecing together patterns quickly before I head to my machines, or adding a quick strip of stitch witchery. Some things that need to be ironed, are not worth firing up the larger iron for, but they still need to be ironed...

5. Pattern "Shape" Weights

Source: Nancy's Notions

I prefer using my rotary blades and pattern weights when it comes to cutting out patterns. It's all about accuracy for me. However, one problem I find with run off the mill pattern weights, as well as handmade ones, is that they don't really give you the option of contouring to the curves in patterns, so nicks and cuts into my patterns is a fairly regular thing because the paper is not held down throughout the curve. I have an 18mm rotary cutter in order to alleviate some of the cut-ins, but it's still not quite enough. I bet with these my pattern pieces would last me a lot longer and my pieces more precise!

6. Darning Tools

Source: Amazon.com
It's a little shocking that I don't have a darning egg or mushroom. It's never been at the highest priority for me, mostly because... well... I use burned out light bulbs when I do need to darn a hole. Darning is a method of repairing a hole in a knit article-- a pretty good skill to have, especially as a knitter with cats that like to chew holes in your knitted projects.


And here's where I'll stop for now. 
I hope you discovered some new items to add your own lists! 


Sunday, March 22, 2015

Mortem's Tricks or Treats: The People Have Spoken-- Simplicity 1459 Cont.

Well, I added all the votes in; the few who used the poll to those who gave me their vote through comments or verbally-- it would seem the sleeves have won.

I got it done on Saturday after binge watching Scrubs on Netflix; I finally have the dress that has been put off for nearly 7 months. In my humble opinion, binge watching any show facilitates the best sessions of sewing.


Simplicity 1459, or as I like to call it 'Dress Interrupted', is what I would consider an intermediate pattern. It has some fiddly bits; especially when it comes to the facings of the collar, the collar itself, and the sleeve facings. Overall, though, not a headache but a good and rewarding challenge. You'll definitely take a lot away to use in future sewing projects.

The instructions are pretty clear and understandable; I didn't read them all the way through, just the portion on attaching the collar to the neckline and facing.


Any alterations I have made were customary, and not for any major errors in the pattern itself. I shortened the length of sleeve and skirt in accordance to my proportions and did my usual SBA. After all this it came out exactly as the image on the pattern envelope.

My only complaints are with the notions it asks you to use; the side zip should've been drafted with an invisible zipper in mind, and I would have done it myself had this dress not already been in the queue for as long as it has. However, the lapped zipper does suffice, and it's only noticeable if you're looking for it. The pattern also has you using only two 1" buttons, but I much prefer the modesty of three 3/4" buttons. The lightweight interfacing for the facings are good, but to give the collar the extra crispness of a true vintage garment, you would need to use a heavier weight.

I also would've added more to it, like little lace appliques on the collar, but once again this was pending for too long.
When enough time elapses, I find it increasingly hard to give a project my 'all' and seek for it to end as quickly as possible so that I may continue with my latest obsession. You see, this is why I tend to finish whatever I am working on fairly quickly and precisely, because it's like I'm racing my own desires.
Yes, it is a pretty major short coming from someone who lives and breathes sewing... but what can I say, I have been known to be rather impulsive at times.

In the beginning, it was intended for a gender-swapped Beetlejuice costume, but since I neglected even the small details, such as the horizontal striping of his suit sleeves, it is now merely a 50's inspired cocktail dress that is very vaguely gothic-esque; as it is, the dress makes a very good dress to either "goth up" with accessories, or keep it simple and classy for more formal events.

Thank you to all those who gave me your "two cents"-- it is much appreciated.
And because I now want a sleeveless dress, my next project is locked in!

Spook ya later!


Tuesday, March 17, 2015

Mortem's Tricks or Treats: Simplicity 1459-- Running A Mock.

Phew.

I feel like I barely have time to breathe!
Not that I'm complaining by any stretch, it's just that I can rarely bask in the small victories I've been accomplishing consecutively.

Consequently, it's been a great excuse to not fully commit to tackling those UFO's I've had lingering in a pile. A few weeks back maybe (?) I found myself with a stretch of days where I didn't have any orders or any binding to sew up... so I casually took to my Simplicity 1459 dress. Surprisingly enough, I was able to get passed the redrafting stage without any interruptions. I even got to the cutting stage!

I continued on it while I was work; that was my first mistake.
My colleagues had a gander at it, and immediately starting joking about the choices in fabric-- without first realizing it's meant as a mock. I chose the ugliest material I had available to me; admittedly, I have completely run out of muslin, and it's a good quality cotton... just not one I would immediately pick (or really anyone). I walked into that one.

As usual, we got busy again and I had completely forgot about working on it, and last week I had a chance to pick it back up. By then everyone, even my mother, was on board with the idea of this dress being one I should wear in public. Well sufficed to say, I was passed the point of saying 'no'.

So what began as a joke, became reality... 


My camera has died, and only today did I realize I had a very old but still functioning smart phone that I use primarily as an authenticator for my games-- remnants of a time when my hubs had a smart phone. Since then we've kind of banned them from our house; I am a flip phone user. It actually would've been nice to have had this realization earlier, as I was able to accomplish something that is as close to euphoria as I could ever achieve, but alas it wasn't for me or anyone I really know-- just a customer. Anyway, I digress.

The final draft came out surprisingly good. I did have to wrestle with it a few times for my SBA (small bust adjustments), because of the sheer size of the collar and the way it's supposed to lay. It's a good challenge.


The cotton I used is just a touch stiffer than the cotton I will use for my actual garment, so it has a few odd folds that I might tinker with. All in all, it's a passable redraft, so I might not. I think what I am most proud with this garment is the fact that everything (other than the thread and fabric) used in its construction was made during the 50's and 60's. A nice little side challenge to make things that much more interesting.

As for how it was received... well, let's just say I haven't blushed so much in a long while.
I had a little trouble styling it, but in the end I went with a milkmaid braid, some stockings (I was going to go with white socks, but it began to rain today), and flats. I wore one of my vintage velvet coats, and a little faux pearl necklace my mother had given me.


As darling as this dress is, I don't think I will be wearing it ever again-- it's just not my color. It was drafted from a size 16 (pattern size), and I have decreased the bust down to 34"-36" (what is typically around a size 14 in patterns) If anyone would like to purchase it from me please feel free to email me for price and any other details; lower price because the inside seams are pinked and faced with stitchwitchery, not serged. I would love to see this go to a home that will fully appreciate it.

With that out of the way, I am going to begin work on the final intended garment, which was to be the gender swapped Beetlejuice... but there's one thing. As cute as the sleeves are, I am half debating not adding them in... I request the aid of my readers, please help me decide! I will leave the poll on the side bar.

Until then!

Wednesday, February 11, 2015

Spooky Basket: Last Year Purchases In Review.

It was cold and rainy today, and I'm definitely not in my best mood... for many, many very important reasons.

I can't really blame my mood on the winter blues, because even as nice as the previous days have been (70-80 Fahrenheit), I have been struggling with this achy heart feeling. It's not the Valentine blues either.
For as much as I deeply need to vent these feelings, and as much as the following might trivialize these emotions I'm feeling... I'm hoping that at least doing this post will distract me some more-- like the other posts since the news have done. I'm sure people are quite perplexed by my chirpy posts despite my family's situation, but I assure you... it's an attempt to create a positive dome for my little spot in the cyber world.

So now that I have confronted that elephant in the room, you can now hopefully understand my position; I'll give a personal update at a later time, when I'm not feeling quite so emotional when I talk about my personal matters.

As the days continue to warm up, my habit of staying locked in my sewing room grow ever stronger. I noticed I haven't been offering much variety in my posts-- sticking to my crafts and idle musings. I haven't even done a Skeleton Closet outfit post since July of last year... probably indicative of the fact that I have little regard for the way my body is shaping up for my 27th birthday in June... I admit, I don't feel all that pretty, more so as of late, and its taken a lot of effort to post the few photos of myself that I have... but that doesn't mean I haven't been purchasing pretty things, heh.

The first items to be mentioned are ones I haven't had a chance to take a photo in, and they are my Purple/black Skeleton Kreepsville dress, and another under bust bodysuit girdle (walmart) with which to wear this clingy dress, and many others like it.

At the same time I was purchasing the two above, which was my first experience with Sourpuss Clothing I might add, I also bought the purple Spooksville bat dress.


I am not crazy about the quality of either dresses, but I can't complain much since: a.) I bought them on sale, and b.) it was gift cards I was spending with. I don't think the straps suit the style of the dress so I am going to turn them into proper straps. I love the color, it's one of my favorite shades of purple, and you can't go wrong with bats either.


I also bought some really neat purple dichroic glass studs from the local art gallery, and got myself a new pair of glasses. They don't wow me like my last pair, but they're comfy and give me a wider range of peripherals. The Kreepsville skull necklace was a Valentines gift.


Going back to Sept, I bought my first pair of doc martens in.... lilac-- a now out of production (?) colorway. I know pastels make most people in the goth community puke... and to those I say smile, it prevents the gag reflexes better than a frown. I had to buy them from a seller on Storenvy, because by the time I found out I wanted them the main Doc Martens website stopped selling them... and that seller just so happened to have a pair in my size. It was material destiny. They hailed from the UK so it took a month to see them.

Rewinding another month, I had ordered a second pair of creepers. Of course being how I am, I needed something you can't find easily on our continent...


My first pair still reside back home in Canada with my momma-- a red and black skull pair with a coffin compartment in the heel; some of you might remember those. I found them in the thrift store for $3! But that is neither here nor there... these pair did cost me a pretty penny. I bought them from Lucky Moon Store on Alixpress. It took its sweet time getting to me, but the seller is very communicative. The quality of the shoe is also pretty top notch-- I was surprised, because they were coming from China... a lesson in giving trust, even in Chinese products which have a notorious reputation.

In June you might remember my post about my still favorite dress purchase.


It's comfy, the print is still very much intact. It's a staple piece to my wardrobe-- everything looks good with it.

I saved the best for last...

Although technically I finished paying for it, and received it this new year... I collaborated and made my down payment last year. It was probably early to mid October? I can't honestly remember when it began...


It's a sewing and vintage Hallowe'en sewing box! I commissioned it from a friend I first me on Deviant Art (a different time and different pseudonym in my life, a story for another post). She owns and runs Myrcury's Toy Box. We have kept in contact through Facebook after the "great meltdown".


I am still extremely fond of her work, and despite my failed promises she still manages to greet me warmly whenever I extol her work, heh. I finally worked up my courage to ask her create for me a totally unique to me item. I gave her my size requirements, and sent her examples of the kind of vintage hallowe'en art I love so much. What I got is without a doubt the most jaw dropping example of why you should always support your local artists. I never question the cost of handmade, because I know the kind of love and hard work that goes into it... and the fact that this was made just for me makes it a very dear to my heart addition to my spooky creative laboratory.


During my unboxing I discovered she sent along a couple very wonderful gifts! I can't say there weren't a few tears when opening this package of mine...


It's going to be hard trumping this purchase... probably the only thing that might, is yet another order from her.

To wrap up this post... here is something some of you have been requesting: my favorite Hallowe'en fabric purchases of 2014:

Maude Ashbury "Spooktacular 2014" collection

Alexander Henry "Midnight Muertos" Collection
Joann's Seasonal fare
The rest from here on are random things I bought from the shop I work at.

"Fabric Fiesta" collection for RJR Fabrics

Top:  "Happy Haunting" collection for Avlyn Fabrics. Glows in the dark.
Bottom: "Black Magic" collection for Henry Glass


This by no means reflects all of my purchases, but my very favorite of them. Can you tell I'm a shopaholic?...

Friday, January 30, 2015

Fashioning My Cyber Microcosm: The Best Homework Ever.

As most of you know, it's time for yet another of Dr. Z's fun homework assignments.
This months assignment is probably my favorite to date, because she asked us "What's on your cutting table?"

Well, Dr. Z... surprisingly not a lot, heh. I like to finish a project that I start; sprinkle a little unwillingness-to-create-more-clutter-in-my-small-room into the mix and I have myself a cocktail of a pretty productive, and in constant use, sewing room. Still, some things do fall off the table, so to say... and for those projects, I commit this post to.

Last year, in Sept. I made a craft exchange deal with a friend. My side of the deal was to knit her a true to show Dr. Who scarf... little did I know what I was getting into....


Don't get me wrong, I am way more than happy to oblige a friend, especially when it's a craft exchange. I love making and receiving handmade things... but this thing is a monster! 
It's 19 inches wide, and its finished length is 13 feet. It feels like it's endless sometimes, and I work on it an hour or two a day, and it's only about 6 1/2 feet so far. Phew! Though, I admit I am a pretty slow knitter (I average about 2 1/2 of these rows every 15 mins) and for some of November, and most of December there were stretches of days I didn't work on it at all.

Another thing I started in September was my first quilt.


In my defense, in the post where I showed it off in the link I did say there wasn't going to be a chance anytime soon to see this quilted. The shop still has a full quota, but the bats and webs will be worth the wait.

Yet another thing I started in Sept. (or was it earlier?) was something I really wanted to be a surprise, but now I am realizing that it's a cursed garment.


I kept saying I was going to finish it; the plan was to have it finished for Halloween, as I was intending to go as a gender swapped Beetlejuice from the 50's. Hair and everything was going to be fantastic... at least in my head it seemed like it was going to be fantastic. I even printed out a cover for one of my books to read as the Handbook For The Recently Deceased, where in a photoshoot I would handle the book with disgust.


I was in the middle of View A. It might still happen... if I can actually sit and work on this dress in peace. Something always comes up.

Finally, I started this early in the month.... I can't truthfully say I lost the steam to finish this project. More like, I realized I have too many other things I should be finishing, so I put this down.


What it is, is a series (4 total) of mixed media pieces I'm doing inspired by images of the Joann's bag I bought. Only, they're going to feature some (also borrowed) vintage hallowe'en images. I have only finished the line work, but my plan is to use watercolors, acrylics, and pencil crayon.


That's it, folks! Hopefully one day these unfinished projects see the finish line! 
It's exciting to see all of the other projects people have on their tables.


Tuesday, January 27, 2015

Mortem's Tricks or Treats: Notion Commotion, Part 1

I have pretty much neglected this sub section of my blog. It was supposed to be the place I share my sewing knowledge... but I'll be frank, looking on it now, it seems kind of redundant, seeing as I typically do that somewhere on this blog anyway. The only difference is that I'll be adding my sewing buys and reviews, which might've made it to Spooky Basket in the past... but I'll keep that for my non sewing related rants and raves.
That said, I think it's about time for another post consolidation session, AKA a blog clean up.

What was formerly Creepy Crafty Crusades will be henceforth known as Mortem's Sewing Tricks or Treats.
I like the sound of it better than C.C.C ... I feel like it better reflects what I do, and it fits better with the new design I have going on.

To begin this post kick off, I want to share some of my favorite notions.

The inspiration for this post came during the beginning weeks of January, the shop where I work at has been buzzing with the new floor plan laid out by boss lady and her best friend. Why is this relevant to sewing notions? Well, dear readers, along with the "unsalable" outs of the shop, we have uncovered a few unsold old notions-- notions from the 80's and 90's hiding away all this time...

We didn't uncover anything that significant, but the discovery reminded me how much I absolutely love sewing gadgetry. Things that are pleasantly helpful but ultimately frivolous... not that I care whether or not my sewing room is wracked with capriciousness.

This is what this post is about. Cool things, neat things, things that make you exclaim 'Ahhh' gleefully.


I know, in the same post I talk of redundancies... I beat the 'sewing notions' dead horse some more, heh.

In my selections, I have included a few of my recent purchases, mixed in with older but they all serve me very well despite not technically meeting the "absolute must have" criteria for me, that so many people seem to place them under. So while I do rave about the items, I do mention their alternatives.

Anyway, onto the product rambling.

1. Dritz Quick Turn 


There are plenty of ways to turn a tube in sewing. Lots of frugally inclined people prefer the ever economic pencil, which has the only benefits of being cheap and easily accessible... but, it's a tool that has been vastly improved upon since its humble beginnings as a writing implement... you can choose from many tube turning gadgets, which include the point former and tube turner, (that looks as though it belongs on a medical tray than in a sewing box) and the classic Loop Turner for example (which offers nights of shrieking in frustration because that darn hook frays your fabric like crazy).

All great choices ultimately, but for my dollar and highest recommendation, I love the tube turners pictured; The Dritz Quick Turns. It's not a new revelation, in fact people used different size straws and chopsticks before this was mass produced... but certainly one nevertheless. To turn tubes with these, one of the ends of the tube is basted shut and the plastic portion shoved inside to that end on the inside, then it's a matter of taking your stick portion and pushing through the tube from the outside. The result? Making extremely quick and easy work of one of the most tedious tasks in sewing, with little to no shrieking in the process. It helps that they're also purple. Can you believe I phoned 3 different Joann's in the surrounding area and even contacted a Dritz representative to find these in a purple colorway? Yes, I am that passionate about my sewing equipment, especially if they're available somewhere in the world in the color purple. By the way, the customer service rep at Dritz was a doll, she was extremely amenable to a sewist as picky as me-- you're technically not supposed to use that channel for purchasing, but I was very persistent (bad me for being so pushy-- do not follow my example in that regard *cough*).

2. Seamfix Seam Ripper


I received my first Seamfix from a retired (and escaped to Phoenix) friend in Holbrook who was downsizing a few things from her sewing room. She gave me a teal one, and I have never looked to another ripper since. As you can see I upgraded to purple, and the usefulness of it continues to gain copious amounts of popularity.

The rubbery/silicone tips remove the cut trimmings after they've been ripped. I am not a pro seamstress, I make many mistakes... so this is just beautiful and saves my poor RSI/CT ridden hands from having to pick them out. They're easy to clean, and much more portable than your average travel sized reusable lint roller (but it does do the job, if that's all you have).
I find the hive like side the less useful of the sides surprisingly enough... perhaps it's because I deal more with fiddly curved areas than the typical straight line in quilting (the target audience for this tool). The "nipple" side is the best side for us garment sewists-- small and pointed for more accurate short strokes.

It really looks like mammary gland.
Unfortunately, these aren't at all cheap in their full sizes-- averaging about $12 U.S. for one... they have little pocket sizes, but they're not that much cheaper and you lose out on one of the two sides. Still, once you try it... you won't be able to look at seam ripping the same without one.

3. Bohin Silicone, Steel tipped Thimble


I'm not 100% on this, but I am pretty sure Clover was the first company to mass produce these sewing marvels that combine the flexibility and grip of a silicone thimble with the added strength of your typical metal one... but Bohin made it heaps more attractive by adding little designs and of course, being the only of the two companies to offer one in purple. Sadly enough, just like Clover's, the color indicates the size of the thimble-- I should've technically bought the pink one, as it's the small, and purple represents the size large... but, purple... 
That's ok though, I forgive them for that slight oversight, I'm fine using a thimble two sizes too big because the silicone makes it practically a non-issue.

Like many sewists, we sometimes face a very stubborn seam that likes to play tug of war with us and our needles, and in this situation when I usually reach for a needle gripper pad, I simply use the same thimble I used to push the needle through to pull it out. Easy peasy.

4. FriXion Erasable Pens by Pilot


Another popular one that is much raved about, these Frixon pens are very dandy... not just for the quilter. The ink disappears with enough heat; by friction or the steam from an iron.
Being a "non pro" sewist, mistakes also happen in the drafting process... where a dart may be placed an inch in the wrong place; a quick blast of steam will make those markings disappear quicker than you can ctrl+alt+delete.
I like the clicker model much more than the needle tipped; it doesn't get caught in the folds as often, but really it's preference because pen style markers are always going to get caught in the drape of fabric. It just depends how heavy handed you are, and I am oafish.

These are fairly reasonably priced... compared to other novelty type pens. The markings are clear, and extremely easy to remove, and that's enough reason for me to buy them, though I also highly recommend the chalk pen, chaco liners, and duo tipped water/air solvable marker-- which are a lot easier to find and cheaper to get a hold of at your local shops than the Frixion pens.

It comes in a variety of ink colors... one being purple that I don't currently own; the reason for that is that I haven't had the chance to go shopping for that color set... especially having drained my significantly smaller disposable income for the month, having allocated more of those funds towards more important matters.

5. Clover Point 2 Point Turner


Finally this last (but not least) product is probably the most underrated-- even I admit to a little halfheartedness towards it (I debated its inclusion to this list). The Point 2 Point Turner by Clover. Maybe it's because it looks underwhelming in which many people tend to overlook it...  
The opinions tend to stay very tentative about this product, and I agree to a certain extent. I bought it because my kittles chewed up my last point turner that I bought at the dollar store up in Canada. My key complain with many generic point turners is that they're a little stubby, so when I laid eyes on this one my main attraction to it was its length. 
After the first few uses, the other uses began unraveling, and unveiling like it was the most natural purpose of a point turner-- every curve on it adds comfort and works to smooth out harsh and soft curves, and turning out the pointiest of points, to the dullest ones. The edges are made so that they can make temporary indentations on fabric that act as markings for a variety of purposes-- like marking the center seam when joining binding ends, or a line that you can follow when stitching ribbon into a design that you won't worry about removing after its sewn on.

A tailor's board is meant to answer the need for smoothing out clipped curves during ironing, but it doesn't always handle well on smaller curves, and it's definitely not cheaper than this little tool. Another thing is simply using the other end of a standard point turner to smooth out the curves, or something similarly rounded off... but it does not have the ease of this tool when doing so.


Tell me what you think; have any of you tinkered with these notions?
Up next, the notions I don't own but definitely have on my wishlist....


Saturday, January 17, 2015

Mortem's Tricks or Treats: There's No Such Thing As Problems...

Only opportunities!

Or, At least I am attempting to convince myself of such...

To get to the point, I grew fatter and my DIY dressform no longer reflects my true body shape. I had to increase its size by one.

"Before"
Part of the reason I didn't want to doodle on Frankiestein much is because I knew eventually my wayward ways will start to accumulate at an incredible rate as I get closer and closer to my 30's-- the idea of spending that much time cursing over my bad joints attempting health always leaves a bad taste in my soul. So, in saying that... it truly disappointed me to know I would have to cover up what is still the best tattoo idea I've ever conjured on a whim. C'est la vie.

I researched a little on how to tackle this problem, and the solution was unanimous-- quilt batting and a 4 way stretch cover.


The supplies are extremely inexpensive (not including my store discount): $6.99 per yard for my swimsuit lycra spandex, $3.50 per yard of 4oz batting, $2.99 for a large needle set that includes a curved or tapestry, cotton tatting thread for $3.99, and finally an old bra.

I didn't use any fancy method of fitting my batting, I cut rectangles and drew with a sharpie marker the relative curve it had to sit on, cut and then tape it down till I found a seam to pin it together, often creating darts.


There were some areas that needed a little extra loft (my bust and derriere), and I shaped and pinned them accordingly, until finally everything was ready to be sutured up.


One of the most alarming things about creating a double is taking on a third person perspective of your entire body. It gives you a truly unbiased look of every nook, every cranny that ultimately makes up you.

Once the batting is sewn in place, it was time to ready the cover... but unlike others, I didn't seem to gain as much weight on my collarbone and neck area. That measurement stayed the same, so I didn't have a space to pin and make taught the fabric I was to use.

I grabbed a garment that had enough curve and was tight fitting... which sadly happened to be something I made not too long ago.


I pinned around it and cut along the inner edge of the pins. Serged the sides and began creating darts until, inevitably, I came out with a true to shape dress form, with every number matching up digit for digit...

I even wore some tight clothing to show my... umm... "curves".
Unfortunately, during the slipping on of the cover, Frankiestien suffered an arm and boob collapse, but it didn't seem to affect the overall look and sizing-- likely because of the bra... but she'll need repair when I eventually drop the weight we both gained. If that day even comes...
Related Posts Plugin for WordPress, Blogger...