
However, I thought I would talk about my experience in something I know very little about (lol): Industrial Sewing Machines.
Because there isn't enough conversation about them from folks who own them, and people who sell them are often unwilling to indulge newbies or most of the time assume you already know what you're getting yourself into.
These past 2 years has afforded me a crash course in the owning and purchasing of a few industrial sewing machines, so this post is going to be a combination of what (little) I do know about them and reviews of the machines I purchased myself.
Sit down in your favorite sewing chair! We're putting the pedal to the metal!
When I lived in San Antonio, I made a really great friend who I keep in close contact with and has become one of the most important people in my life-- I don't say this lightly. This friend helped me get in contact with someone who gave me first hand experience in a professional designer/fashion environment as a volunteer intern for Fashion Consulting, Pattern and Samples Services.
But most importantly, this friend gave me my first industrial sewing machine.
I owe them a debt I probably can't repay.
Entrer Vintage Consew 220.

She was in rough shape when I first received her, and it became a side project for us to rehab her to get her sewing properly, and it took A LOT of work. It turned out to be a good thing though, because when we fixed her up together I learned the bulk of what I now know about these majestic beauties: the difference between clutch and servo motors, dispelling misconceptions about industrials in general, and even putting some of my previously known tidbits into practice.
Let's start with needles.
See, there's a very specific way an industrial needle needs to be inserted otherwise it messes with the stitch, and household machine needles are manufactured with an ease of use/insertion "flat side" so the user doesn't really need to think about the "anatomy of a needle". Plus the entire mechanism is laid out so that many households now have a drop down bobbin that makes the needle eye/hole face the user, and for some reason that makes it intuitive; it's completely dummy proof.
Even though I knew all this before, I still needed a refresher of what I am looking at when it comes to a needle.
In case you need a refresher too, here it is:
 |
| Credit: Sailrite |
On all my industrials so far, the "scarf" needs to be oriented to the right and the "groove" to the left, perpendicular to the seam guides; it was also my understanding that the thread must always be thread through the needle from left to right, it makes sense then that the groove has to be on the left because the thread fits snugly into it, and that helped me to remember (after many failed stitch samples).
So why is it so important to know this?
Because it's tricky getting the right placement even when you know all the above since, unlike those household needles, the shank on these are round all the way, hence why knowing the actual needle is going to be your biggest help... A scarf facing too far front or too far back can also affect the quality of your stitch.
A needle inserter tool helps, though keep in mind they're made with a flat back groove and weren't intended for thick gauges... but it still helps when you have butter fingers.
I struggled for months fighting with this machine on certain projects, getting over the immense learning curve. I thought that once I knew about the needles it would be smooth sailing... I couldn't understand why I was still having trouble.
It wasn't until after the hundredth time researching for troubleshooting that I learned one very important but simple fact about industrial sewing machines:
There is no "all-in-one" industrial machine, which is the opposite said of household machines.
Industrial machines are quite literally made for a singular purpose and they do it as efficiently as a machine can be, so they can seem to go wonky when you deviate from that "purpose". That is why there are SO MANY different types of industrial machines: from blind hem, walking foots, cylinder beds, chain stitch to lock stitch. Even whether or not it is a zig-zag or straight stitch, or single or twin needle machine. Whereas on a household machine, it's simply a matter of changing the stitch from their plethora of stitches and swapping out for the appropriate foot.
Household sewing machines are made to be able to give a user a taste of the full range of sewing applications available, but that does not necessarily make them efficient at any one of those tasks: jack of all trades, master of none.
I also discovered a little factoid along the way that I myself didn't realize: did you know that the "industrial" in industrial sewing machine refers to the speed/stitches per minute? Because even a household machine can have a strong enough motor to sew heavy duty materials.
On average the fastest "household" will claim around 1500 SPM give or take, whereas many "industrial" machines could go all the way up to about 7000 SPM.

Anyway.
I was under the mistaken impression that I could sew my lightweight materials (they sewed quite nicely) as well as some very heavy duty canvas/vinyls/etc on the Consew 220 (they didn't) because I was/am able to on my household.
Even with the strongest and largest rated needle on the list of sizes it can use, the quality of the stitch was as mediocre as my household because the machine wasn't made to sew such heavy duty fabrics. Thus constant struggle.
Apart from the above, I think another reason I struggled with this machine was also due to the fact that it was powered via a clutch motor.
Industrial sewing machines can come with one of two motors: clutch or servo. An older industrial machine will most likely be equipped with a clutch motor, such was the case.
Apart from the above, I think another reason I struggled with this machine was also due to the fact that it was powered via a clutch motor.
Industrial sewing machines can come with one of two motors: clutch or servo. An older industrial machine will most likely be equipped with a clutch motor, such was the case.
Clutch motors are very fast, kinda finicky, low control, and extra noisy beasts.
The benefits (allegedly) of a clutch motor are that it's more powerful, faster, and it forces you to develop better control habits at the machine itself.
The benefits (allegedly) of a clutch motor are that it's more powerful, faster, and it forces you to develop better control habits at the machine itself.
You switch on the motor and it constantly runs, consuming energy whether or not you engage for sewing... hence the noise. I can attest that yes it is very fast but you sacrifice maneuverability for that speed. The peddle is very sensitive (see finicky) so it takes a seasoned foot to be able to graduate speeds, feather footed I once heard it being called. Stopping isn't easy either-- you have to stop a few stitches before the end or you end up with a few extra stitches.
Maybe I just severely lacked the finesse and patience this machine required for its very steep learning curve, but I always felt like I was fighting it.
To top it all off, this machine lacked a good system to change the stitch length (I won't even try and explain how one goes about changing stitch length on this thing) and most importantly it did not have back stitch capacity; I had to manually turn the project (not always easy) and head back to "lock" the stitch in place, or tie the knots myself from the thread tails... a very cumbersome task when speed is supposed to be the point.
I tolerated all this since A) it was a gift and I wasn't sewing for business anyway and B) my households were good enough for my own purposes when the Consew and I had one of our frequent disagreements.
Then a year ago, I started Strange Coven and production time became kind of important as demand grew and grew, I also wanted my bags to be made with heavy duty materials because it meant long term wear and usage for them.
And so once again, I struggled with the Consew.
It was when I started noticing the bald spots on my head (from having pulled out so much hair) that I decided I needed some different machinery. I started researching industrial machines for heavy duty sewing: I knew I wanted to try a servo motor, have back stitch capacity, and a stitch length dial.
I should note that the 220 seems to be an anomaly in regards to back stitch capacity, most industrials even older ones have this ability... so it's just weird. Maybe an older Consew thing? I simply don't know.
Entrer The Fabricator by Sailrite.
 The fabricator is a walking foot industrial sewing machine.
A walking foot is exactly what it sounds like: instead of squeezing material along a normal presser foot, the specialized foot/feet "walk along" the material (video example). This movement is key when feeding thick or lofty materials to sew as it eliminates the pulling and tugging that causes irregular or skipped stitches when dealing with such thicknesses.
The Fabricator is a recent addition to Sailrite's currently tiny repertoire of table topped machines. Sailrite wasn't a brand I was intimately acquainted with-- I first heard about them back when I lived in New Mexico when I was searching compact heavy duty machines for the shiggles, to which Sailrite boasted some of the best rated on the web; I remembered seeing the Fabricator in passing on their website, ooggled the fact that it was glorious to behold, but the price tag was far beyond my reach then.
It took quite a lot of agonizing to pull the trigger on it, as I tried to weigh it against what I was exposed to: Juki and Consew, brands I recognized and trusted (at least for the most part; I own a fantastic Juki serger)... But NO ONE was talking about their industrials in my circles, and the Fabricator was taunting me with its sleek black exterior that also no one was making much of a peep about...
I tolerated all this since A) it was a gift and I wasn't sewing for business anyway and B) my households were good enough for my own purposes when the Consew and I had one of our frequent disagreements.
Then a year ago, I started Strange Coven and production time became kind of important as demand grew and grew, I also wanted my bags to be made with heavy duty materials because it meant long term wear and usage for them.
And so once again, I struggled with the Consew.
It was when I started noticing the bald spots on my head (from having pulled out so much hair) that I decided I needed some different machinery. I started researching industrial machines for heavy duty sewing: I knew I wanted to try a servo motor, have back stitch capacity, and a stitch length dial.
I should note that the 220 seems to be an anomaly in regards to back stitch capacity, most industrials even older ones have this ability... so it's just weird. Maybe an older Consew thing? I simply don't know.
Entrer The Fabricator by Sailrite.

A walking foot is exactly what it sounds like: instead of squeezing material along a normal presser foot, the specialized foot/feet "walk along" the material (video example). This movement is key when feeding thick or lofty materials to sew as it eliminates the pulling and tugging that causes irregular or skipped stitches when dealing with such thicknesses.
The Fabricator is a recent addition to Sailrite's currently tiny repertoire of table topped machines. Sailrite wasn't a brand I was intimately acquainted with-- I first heard about them back when I lived in New Mexico when I was searching compact heavy duty machines for the shiggles, to which Sailrite boasted some of the best rated on the web; I remembered seeing the Fabricator in passing on their website, ooggled the fact that it was glorious to behold, but the price tag was far beyond my reach then.
It took quite a lot of agonizing to pull the trigger on it, as I tried to weigh it against what I was exposed to: Juki and Consew, brands I recognized and trusted (at least for the most part; I own a fantastic Juki serger)... But NO ONE was talking about their industrials in my circles, and the Fabricator was taunting me with its sleek black exterior that also no one was making much of a peep about...
EDIT: Ironically, I did end up finding a great youtube channel that I now follow and they have a video review/unboxing of the machine: here it is.
The deciding factor ultimately was the overwhelmingly positive reviews Sailrite has as a company; their customer service is incredibly helpful. Seriously, if you got a question they will answer it... but you probably won't have any because they cover so much on their website which is very intuitive and user friendly, and their Youtube channel is chock full of great quality and informative videos; they radiate quality.
Although Juki and Consew are pretty much household names (not to be confused with only manufacturing household machines), their customer service is less than stellar, but workable.
Plus I love a good underdog.

I have to take another moment here to continue fangirling over Sailrite because their packaging was so clean, so tidy and so secure. Everything felt packed with love!
Oh and in case their online help isn't quite enough, the manuals are printed in full glossy color glory with step by step photos on every process; from building the table, to setting it up, to maintenance, to troubleshooting.
It came with a package of schmetz industrial needles and a large spool of V-92 Bonded outdoor thread in white-- very nice bonuses!
So let's go back to motors again for moment:
Servo motors differ from clutch motors in that they offer variable/controlled speeds (don't need to be feather footed to be able to graduate speeds or stop on a dime), it only engages when you sew so it's hella smooth and best of all... it's much quieter.
Again, it comes down to what you prefer/are comfortable with; super fast speeds with limited control, or decently fast speeds with mucho control. You decide.
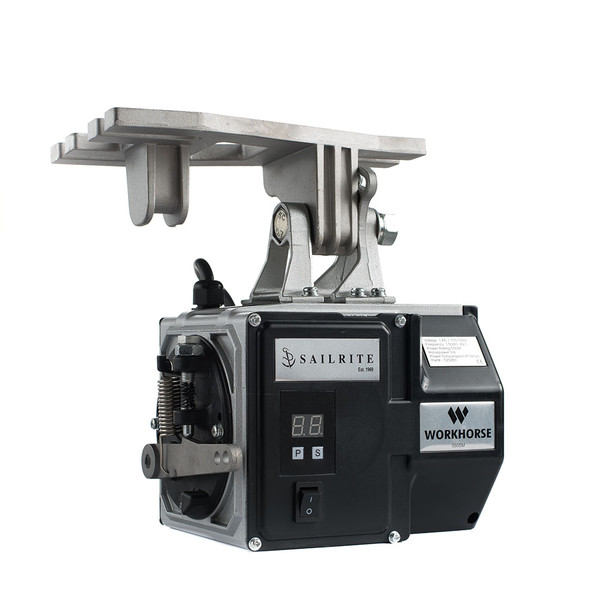
The workhorse servo motor is a Sailrite exclusive. I can't tell you how it differs from other servo motors because I simply don't have a good enough basis for comparison. It has a digital display for setting SPMs which I like but not uncommon. The only immediate difference I see is that the belt used to drive the balance wheel is cogged which prevents the belt from slipping on the wheel (also notched on their machines; don't know if that is an exclusive design) thus offering a little more driving power. It seems modular, on the website you can buy a small selection of attachments/belts that affect the strength of the drive. Not much to say in regards to the motor in terms of how it runs, I think the workhorse might actually be just a little stronger since I've sewn some hardcore thicknesses like they're nothing more than quilting cotton... but my judgement might be skewed by the previously mentioned factors. The top speed pales in comparison to the clutch motor however-- top speed for the Consew's motor was 5500 SPM while the Workhorse is a paltry 3600 SPM.
One of the "quirks" the Fabricator has that often lead me to make threading mistakes is that the bobbin feeds out of the casing in a clockwise fashion, which is the opposite of how it is most commonly distributed on other industrial machines.
Even all my household machines feed their bobbins counterclockwise.
I couldn't find a reason why this was... so I guess c'est la vie.

Oh and in case their online help isn't quite enough, the manuals are printed in full glossy color glory with step by step photos on every process; from building the table, to setting it up, to maintenance, to troubleshooting.
It came with a package of schmetz industrial needles and a large spool of V-92 Bonded outdoor thread in white-- very nice bonuses!
So let's go back to motors again for moment:
Servo motors differ from clutch motors in that they offer variable/controlled speeds (don't need to be feather footed to be able to graduate speeds or stop on a dime), it only engages when you sew so it's hella smooth and best of all... it's much quieter.
Again, it comes down to what you prefer/are comfortable with; super fast speeds with limited control, or decently fast speeds with mucho control. You decide.
 |
| Credit: Sailrite |
One of the "quirks" the Fabricator has that often lead me to make threading mistakes is that the bobbin feeds out of the casing in a clockwise fashion, which is the opposite of how it is most commonly distributed on other industrial machines.
Even all my household machines feed their bobbins counterclockwise.
I couldn't find a reason why this was... so I guess c'est la vie.

The downright negatives to the Sailrite Fabricator come in the form of the little things. The table it comes with is not as high quality as everything else. None of the placement holes came predrilled or even premarked; it's significantly lighter than the head so I question how stable it will remain even after almost a year of owning and using it. Plus the "ruler" on it isn't printed/painted on, it's instead a sticker that comes off super easy; I never use it granted but I liked the option of it being there as a permanent aesthetic... I have already taken it off because it came up around the edges within the first few days.
The pin of the bobbin winder seems a touch too big than the holes in the bobbins, so it's tough getting the bobbin on and it's a tug of war getting them off the winder. I hoped it would be easier with time, but no change as of writing this. The screw drivers it came with are super cheap, in fact they broke while we were setting everything up.
It also didn't come with a table mounted power switch, which during my time at the fashion haus and with the Consew I own, I assumed came standard with all machines and really liked it; again I haven't as of writing this done any research into whether or not this feature can even happen with a workhorse motor, so we'll see.
Overall nothing deal breaking.
The combination of machines was working well, and things were ok for a time.; every function I required was met with the Consew and the Fabricator.
Until the combination of all my complaints with the Consew had finally come to blows for the last time.
In the fashion haus, I had the privilege of working with a number of industrial Juki's closely. Since I knew I always wanted another Juki and I didn't end up getting a Juki walking foot (the one machine I didn't get to work on, ironically)... I decided, in September, that my next machine purchase was going to be the one I had worked the closest with.
Entrer the Juki DDL-8700

The Juki DDL-8700 is a single needle lockstitch machine.
A lockstitch is just a fancy and concise way of referencing the common/standard way a stitch is created on many sewing machines.
You may have seen this gif in one version or another:
 That's a lockstitch. The Consew and the Fabricator also utilize a lockstick mechanism, and probably yours too!
Pretty riveting stuff... No really! It is when you really think about it. That movement is happening super fast on these machines. You really just sit in awe at the precision and calibration of sewing machines; mechanical wonders to entice the imagination.
The Juki came with all the trimmings: servo motor (✔), reverse stitch (✔), easy to use stitch length dial (✔), robust table with permanent ruler design (✔), table mounted power switch (✔), and a perfectly functioning bobbin winder (✔). It came with a decent dust cover as a bonus, but since I've been using the machine practically everyday since I received it, I don't use it.
I did try to sew some of the heavy duty material that sews like butter on the Fabricator, on this machine to see if there was a difference between the servo motors but the machine belt kept slipping on the wheel to drive the needle down into the thickness I was feeding it.
Since it isn't a walking foot either, the layers kept slipping around making the whole experience like reliving the frustration of the Consew.
So, that was a wash. I still can't tell a difference in power, and the SPM's on the Juki's motor is significantly faster with a top speed of 5500 (just like the clutch motor) but it's a dial instead of a digital display, nothing wrong with it technically... but also not easy to see whether or not its been changed when one of your fur babes decides to poke around... lol.
I think I have the least amount of complaints with the Juki overall, less than any of my machines in general, and I actually didn't purchase this Juki through a dealer. I decided to take a gamble and purchase the machine through Ebay, because it was hundreds of dollars cheaper due to the free shipping. It came out to just about $700 exact -- that's just a pinch more than many digital household sewing machines!
My only complaints with the Juki are that there isn't any help in terms of assembly instructions such as the building of the table that comes with it. The manual it does come with is basically a pamphlet filled with brief rudimentary instructions that cover only the essential but initial key points and a tiny handful of troubleshooting... all in a slightly convoluted format (several languages to explain one thing on a page). I ended up using the Fabricator's manual to supplement what I found around the web.
It too came with very cheap screwdrivers that broke almost immediately and sadly it wasn't packed up the best-- the legs suffered a little warping during shipment.
However, the table came pre drilled and that to me made up for whatever I had issue with.
So now that I've covered all the reviews and impressions, let's discuss something they all have in common: Maintenance.
It comes as little surprise that an industrial's maintenance schedule is farther out than a common household machine. That's due in part to the fact that the mechanisms and gears that drive the entire machine are constantly submerged in a pan of machine oil preventing friction, that causes heat, that inevitably causes wear and tear.
The oil used in these pans is no different than the oil used in any other sewing machine kit. There's just more of it that's readily available for the machine to siphon instead of relying on a fallible human to remember to oil it.

I haven't felt a need to take my machines in for a tune up yet.
Mostly, it's been just a matter of babysitting the oil levels and making sure that the reservoir is clear of lint and other debris. You don't need to replace the oil unless it looks dark colored like brown or gold or has too much debris to remove on your own.
Removing the lint from the machine is easy too. Just take a brush to the areas I marked with an arrow in the photo below: where the bobbin case is and the space/pan below it that catches most of the fallout from the feed dogs.

The needles also don't need to be changed out as often because they're more robustly manufactured and meant for long term high speed usage. Aside from the ones I broke (mea culpa, nothing to do with the machine), I haven't had to replace the last ones I inserted-- that was months and many, many hours of usage ago.
Last but not least: Cost.
Weighing the cost to usage seems to be the pervading concern with industrial sewing machines; is it even worth it to invest if all you're doing is sewing for home?
For me, I measure the value of time a little heavier so time saved = great savings, and honestly the single needle lock stitch is only marginally more spendy than any mid range digital household machine. I also factor in maintenance costs; I took in my households at least once to twice a year to get a tune up/re-timing (roughly $75 to $100 every time on digitally calibrated machines depending where I took them), but I also spent hours and hours doing some of that myself along with weekly time scheduled to clean and oil the households.
An industrial was a great investment for me, but then even before I started Strange Coven I was spending huge amounts of hours at my sewing machine to make it worth it.
I think that about covers my entire experience/knowledge on industrial sewing machines.
I know, it's a lot to take in and perhaps I should've broken up this post into several parts...
Nevertheless, I hope I helped to scratch the surface and maybe help a fellow sewist consider making the investment... because once you go industrial, it's tough to go back to anything else.
The pin of the bobbin winder seems a touch too big than the holes in the bobbins, so it's tough getting the bobbin on and it's a tug of war getting them off the winder. I hoped it would be easier with time, but no change as of writing this. The screw drivers it came with are super cheap, in fact they broke while we were setting everything up.
It also didn't come with a table mounted power switch, which during my time at the fashion haus and with the Consew I own, I assumed came standard with all machines and really liked it; again I haven't as of writing this done any research into whether or not this feature can even happen with a workhorse motor, so we'll see.
Overall nothing deal breaking.
The combination of machines was working well, and things were ok for a time.; every function I required was met with the Consew and the Fabricator.
Until the combination of all my complaints with the Consew had finally come to blows for the last time.
In the fashion haus, I had the privilege of working with a number of industrial Juki's closely. Since I knew I always wanted another Juki and I didn't end up getting a Juki walking foot (the one machine I didn't get to work on, ironically)... I decided, in September, that my next machine purchase was going to be the one I had worked the closest with.
Entrer the Juki DDL-8700

The Juki DDL-8700 is a single needle lockstitch machine.
A lockstitch is just a fancy and concise way of referencing the common/standard way a stitch is created on many sewing machines.
You may have seen this gif in one version or another:

Pretty riveting stuff... No really! It is when you really think about it. That movement is happening super fast on these machines. You really just sit in awe at the precision and calibration of sewing machines; mechanical wonders to entice the imagination.
The Juki came with all the trimmings: servo motor (✔), reverse stitch (✔), easy to use stitch length dial (✔), robust table with permanent ruler design (✔), table mounted power switch (✔), and a perfectly functioning bobbin winder (✔). It came with a decent dust cover as a bonus, but since I've been using the machine practically everyday since I received it, I don't use it.
I did try to sew some of the heavy duty material that sews like butter on the Fabricator, on this machine to see if there was a difference between the servo motors but the machine belt kept slipping on the wheel to drive the needle down into the thickness I was feeding it.
Since it isn't a walking foot either, the layers kept slipping around making the whole experience like reliving the frustration of the Consew.
So, that was a wash. I still can't tell a difference in power, and the SPM's on the Juki's motor is significantly faster with a top speed of 5500 (just like the clutch motor) but it's a dial instead of a digital display, nothing wrong with it technically... but also not easy to see whether or not its been changed when one of your fur babes decides to poke around... lol.
I think I have the least amount of complaints with the Juki overall, less than any of my machines in general, and I actually didn't purchase this Juki through a dealer. I decided to take a gamble and purchase the machine through Ebay, because it was hundreds of dollars cheaper due to the free shipping. It came out to just about $700 exact -- that's just a pinch more than many digital household sewing machines!
My only complaints with the Juki are that there isn't any help in terms of assembly instructions such as the building of the table that comes with it. The manual it does come with is basically a pamphlet filled with brief rudimentary instructions that cover only the essential but initial key points and a tiny handful of troubleshooting... all in a slightly convoluted format (several languages to explain one thing on a page). I ended up using the Fabricator's manual to supplement what I found around the web.
It too came with very cheap screwdrivers that broke almost immediately and sadly it wasn't packed up the best-- the legs suffered a little warping during shipment.
However, the table came pre drilled and that to me made up for whatever I had issue with.
So now that I've covered all the reviews and impressions, let's discuss something they all have in common: Maintenance.
It comes as little surprise that an industrial's maintenance schedule is farther out than a common household machine. That's due in part to the fact that the mechanisms and gears that drive the entire machine are constantly submerged in a pan of machine oil preventing friction, that causes heat, that inevitably causes wear and tear.
The oil used in these pans is no different than the oil used in any other sewing machine kit. There's just more of it that's readily available for the machine to siphon instead of relying on a fallible human to remember to oil it.

I haven't felt a need to take my machines in for a tune up yet.
Mostly, it's been just a matter of babysitting the oil levels and making sure that the reservoir is clear of lint and other debris. You don't need to replace the oil unless it looks dark colored like brown or gold or has too much debris to remove on your own.
Removing the lint from the machine is easy too. Just take a brush to the areas I marked with an arrow in the photo below: where the bobbin case is and the space/pan below it that catches most of the fallout from the feed dogs.

The needles also don't need to be changed out as often because they're more robustly manufactured and meant for long term high speed usage. Aside from the ones I broke (mea culpa, nothing to do with the machine), I haven't had to replace the last ones I inserted-- that was months and many, many hours of usage ago.
Last but not least: Cost.
Weighing the cost to usage seems to be the pervading concern with industrial sewing machines; is it even worth it to invest if all you're doing is sewing for home?
For me, I measure the value of time a little heavier so time saved = great savings, and honestly the single needle lock stitch is only marginally more spendy than any mid range digital household machine. I also factor in maintenance costs; I took in my households at least once to twice a year to get a tune up/re-timing (roughly $75 to $100 every time on digitally calibrated machines depending where I took them), but I also spent hours and hours doing some of that myself along with weekly time scheduled to clean and oil the households.
An industrial was a great investment for me, but then even before I started Strange Coven I was spending huge amounts of hours at my sewing machine to make it worth it.
I think that about covers my entire experience/knowledge on industrial sewing machines.
I know, it's a lot to take in and perhaps I should've broken up this post into several parts...
Nevertheless, I hope I helped to scratch the surface and maybe help a fellow sewist consider making the investment... because once you go industrial, it's tough to go back to anything else.
Feel free to ask me questions, I'll do my best to answer them!
Spook ya later, fiends!


