Wednesday, October 23, 2013

Skeleton Closet: Attack of the Killer Copy 'Bat' + Pattern Review

And by 'killer' I mean awesome... hahah!
I should make a sectional of my blog for my copy cat dealings-- hmm.

So in one of my previous posts, I wrote that my mother sent me some money for a little retail therapy during my health issues. In it, I expressed the desire for a couple Hell Bunny dresses, but one seems discontinued while the other is not viable financially.
For the price of both of these dresses, I was able to purchase everything I needed for all the dresses I planned for in that post-- a total a 4, including the one I didn't mention much.

Last post, I revealed a sneak peek of the dress I was working on, but did not mention which one...
Well, dear readers...
VoilĂ !

Sporting my broken spare glasses...

This is the New Look pattern 6457 in view A.


From afar the pattern of the fabric merely looks like multi colored polka-dots... but when you come up close, it reveals itself to be eyeballs on a faint spiderweb background. This dress is meant to somewhat mimic the simplistic but outrageously awesome Hell Bunny eyeball dress.

As some of you know, I currently have a "thing" for eyeball things... this dress was an inevitable contribution to my wardrobe.

Knock-off dress with my knock-off hair bows
The dress itself needed some fit adjustments around the curvature of the bodice side front pieces, since I am not as well endowed as your average woman-- I still have the body of a teen that just barely hit puberty. And believe it or not, it can sometimes work in as an advantage.


Another adjustment to be done was the length of the skirt. It wasn't a huge deal since the pattern inadvertently lays it out for you.


The line which you're supposed to sew your ribbon trim also works in shortening the skirt overall. I chose to cut on the highest line-- on me, it creates the perfect length just a bit above my knees since I am merely 5 feet tall.


It goes without saying that the straps needed adjustment also. I have excruciatingly narrow and short shoulders, disproportional to my torso-- meaning nothing off-the-rack with straps ever fits properly.
The instructions mention only overlapping the front of the straps, while keeping the back untucked.
I didn't think that looked clean enough for me, so I simply did the same at the back as in the front.


Once the band is stitched on, the inside looks super clean and tailored. It would be even better if this dress was lined, but I didn't buy any fabric be able to do that.

The only disappointing factor was the difficulty I had matching the pattern of the fabric with seams; it's an absurdly random pattern, and I just couldn't find the magic formula to prevent cut offs-- I did my best, but it wasn't enough! Ugh. Guess that is my penance for mismatching my husband's shorts, heh!


Pattern overview:

  • View A is a simple silhouette, there was little to no road blocks in dealing with adjustment issues; basic level knowledge. Great for the beginner.
  • Optional extras: tailor's ham to press around curves for better sewing results.
  • I would sew this dress again; it's fun, cute, and works really well with busy prints.
I'm pretty stoked that I now own an eyeball dress-- huzzah!
Also, you must check out my awesome tights, as I'm equally stoked about them, too! I found them at Dollar General... isn't that crazy?!


What I'm wearing:
  • Dress: New Look pattern 6457
  • Anatomical heart necklace: self -made
  • Eyball hairbows: self-made knock off
  • Tights: Dollar General
  • Belt: Fairweather Co.
  • Boots: K-mart

Sunday, October 20, 2013

Creepy Craft Crusades: Emotional Brew

Such a mix of feelings this month has brought so far.
A mix of several inconveniences, and one giant wallop of good news.

The good news is that government shutdown is officially over.
My husband went back to work this past Thursday from his two week and a half furlough. What's more, we've received news that the whole time will be back-paid to us... at least the federal employees. 
I wouldn't call the lost time a "vacation", because that would mean ignoring the worry and anxiety of waiting for a conclusion, for the perception that this time was somehow enjoyable...

Anyway.

Since it was an emotionally taxing month, it seems only natural that I would immerse myself completely in my sewing... it's the best way that I can wind down or blow off steam, and it works oh so well.
I admit to being slightly surprised that this sewing streak is still going strong despite having lost a great chunk of worry-- at this point my fingers and brain would be telling me to slow down and enjoy the "victory"... but no.

I have begun yet another commercial pattern (from my latest pattern haul) which will later be reviewed upon successful completion. For now, all I have to offer is the muslin stage of the bodice from one of the said dresses, and a semi-panoramic view of my sewing room in its current state:


Before this pattern and after the shorts I created last post, I (reluctantly) drafted the pattern and already sewn a pair of Star Wars shorts for my husband. They feature my very first attempt at seam pockets-- which came out beautifully.
The reason for my reluctance was purely because it's Star Wars, and I'm a Trekkie.
I think it's safe to say that love hath no boundaries.


However!  I am allowed one petty act, I think, heh...
The miss-matched pattern of the fabric was an intentional but subtle jab.
I didn't want the shorts to be the very best that they could be, even though it really really disturbs my inner seamstress.
As I've finished mentioning, we may be husband and wife, but I am and was always a Trekkie... at least the rest of it has my best efforts, hah!


He's also sporting a bleach dye shirt I made him, too! It's one I made him months ago, but I just never blogged about-- there's a lot of projects that go unblogged. It's a Spinal Tap shirt!
Here's the back of it:


If you haven't seen the mockumentary that started a real band, then I suggest you watch it ASAP. It's quite funny, and surprisingly catchy.

And so comes the part where I let you in on a couple bits of bad news...
One of the issues that caused the shutdown was really only postponed... meaning this all could potentially happen yet again!
And for extra fun, both my main and spare pair of glasses suffered unfortunate accidents...

Monday, October 7, 2013

Skeleton Closet: Simplicity 2367 Review -- Reader's Choice

After months of planning on creating the shorts from one of these patterns (view D--simplicity). I finally got around to sewing it.
Since it isn't my pattern originally, the first thing I did was to copy each individual piece onto tissue paper... although, I really feel like that should be done no matter what; it extends the life of the pattern.

Anyway, in the post I linked, I had a bit of choice in front of me that I left up to my readers-- which one was I to make first? It wasn't a unanimous choice, but the shorts ended up being it.


And here it is. I changed my design decisions a bit from the initial plan-- it wasn't a large deviation, but instead of the intended venetian lace trim around the leg bands, I chose to create an overlay on the pockets; a little more subtle, just so I can easily match it up with anything in my wardrobe. It has a side zipper closure, and the pockets are quite deep and roomy.

During the mock up, which is too ugly for photos ( pale yellow satin marked with purple felt tip) I noticed some errors on the pattern and on the directions; I hope they were found and quickly fixed... but in this copy, they are present.

The mistakes are concentrated around the waist band; when you're piecing the 4 waist band pieces (2 front, 2 back) together you end up with 2 completed waist bands; one is your facing. Quite regrettably, I didn't take any photos of this, so this is going to sound profoundly confusing... I will create an example and update this post in the future.

The confusion comes when you're stitching them together; it directs you to stitch each band at the right side seam, which I assumed was the right sides of both front pieces because it did not specify.
When I started piecing the completed bands onto the shorts, I noticed that the facing wouldn't line with the base band; it ended up front with back, instead of front and front. So, you'll need to stitch to the left seam of one of the bands and it'll be correct in the end-- the one with only one side of interfacing so that the front won't be too stiff.
Next, the dot marks on the pattern piece of the front waist bands needed to mark where the front tabs go is not printed in for size 14-- which is the size I am. I took my seam gauge and approximated the distance between each dot for each size and then made the dot mark for my size.

Once again, I deeply apologize for not taking photos of this-- it's rather important if you're going to undertake this pattern.

But anyway. Near completion I realized I only had 14 inch invisible zippers, and this pattern needed a 7 inch zipper.


Since I don't have zipper stops, I had to DIY it. I first thought of melting the teeth together at the length I needed, but then I remembered I didn't have my soldering wand for precision melting...
Using super glue will fall off after a few washes, and stitching an overcast stop tears apart after enough wear... next best thing? Nail polish coated overcast stitch.


I figured this method out after a few bad trials with most DIY stop methods. I deduced that since nail polish makes a great fray check that stays nearly indefinitely, why wouldn't it work for protecting the overcast zipper stop. Best idea ever, I tell ya... and yes, I'm tooting my own horn.

As I mentioned, the pockets are done with an overlay of lace, and binded with bias tape-- although the pattern calls for folding under and top stitching all around. I liked the look of the bias tape.


All in all the pattern needed very little alteration-- I just added a bit of length to the leg bands because they were a touch too tight when I sat down. But yes, it was a nice weekend project... and luckily we are still of the weather to wear shorts down here in the deserty south.
Oh and the buttons! Can't forget about the buttons... they're my favorite! They're metal skull shank buttons that I picked up on Etsy several months ago.


What I am Wearing:
  • Top: K-mart
  • Shorts: Self-made with Simplicity pattern 2367 in view D
  • Shoes: Hand-me-downs from my momma's old wardrobe

Friday, October 4, 2013

Mortem's Tricks or Treats: Things To Do While Waiting.

My husband has been home every day since Monday when the news was announced that the U.S. government shut down, and most everyone in federal jobs were sent on leave without pay until further notice. Without going too far into it, things don't look good for many of us, and it's quite shocking to see the negative responses of such an event-- it's been quite stressful with how sporadic the government has been. First the sequestration happened, which destroyed the chance to move those months ago... and now this. It feels like we can't catch a break.

We are biding our time until then, pooling and squeezing each resource available to us since town living is not as cheap as one may think. We're not hurting yet since we've been able to make the best of what we have... that is, everything aside from entertaining ourselves. Squeezing pennies means we don't have the luxury of even taking a drive, since anywhere of note will likely cost $40 in gas... and well, the only place of note nearby is a National Park-- go figure, it's closed because of the shutdown.

On the brightside, my health has been doing alright (knock on wood)-- I haven't needed the surgery as far as we can tell since my gallstones are still mobile; I've been getting the hang of which foods don't trigger a severe attack... I still wonder the long term effects taking all these pain meds means, though.

Enough of depressing realities...

After a comment from Lynoire regarding the eyeball hairbows... it got me to thinking, what else can the crafting of eyeballs be used for? Other than jewelry and, well, hairbows.
As a self-proclaimed seamstress, the answer should've came to me right away! Better late than never, right?

Pattern weight decorations!


I'm constantly in need of pattern weights since I somehow end up losing them.
Remember my post regarding DIY Notions? Well I was never able to find good enough buttons for my pattern weights, so they have always been rather unfinished looking-- I save my good ones for when I feel like shooting progress shots of my sewing (heh!). Well, now I don't have to! These were two crappy turn-outs from before, but on they went onto two of my weights.

The good and the awesome.
I love novelty sewing notions... I'm such a sucker for anything that can reflect my tastes-- especially my tools!
On a side note.. copper BB's would add considerably more weight than just washers glued together; they end up as heavy as the store bought ones shown in purple. My husband happens to own a BB gun, that's the only reason I was able to acquire them... otherwise, it's too expensive a material.

In other crafty news,yesterday my husband and I finally got around to building the foundations of a cardboard cat condo. It's not as grandiose as I would like since we lack the space, but well, the cats love it.


I even built in a staircase.
And yes, you read and see correctly... cats.
This past Sunday we made the adoption of our latest beautiful bombay boy: Khan Edgar. He came to us already fixed, chipped and updated with shots-- which is nice because the day after adopting him, the news hit us.


We wondered if it was a good idea to have two rambunctious boys, and worried that the integration would be hell, as so many have warned us it would be... 
Luckily, Poe is the sweetest most welcoming soul and has accepted his new stepbrother with open paws. After some initial hissing and sniffs on the first day, by the second day they were already snuggling each other... and it hasn't faltered slightly since... or maybe I should say yet? Heh.


Friday, September 27, 2013

Tales Of Trial and Terror: Diary Of A Copy Cat.

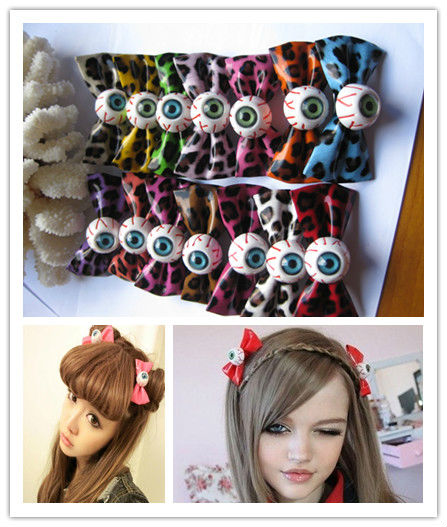
I am crazy over the new eyeball trend... crazy, I say!
Meagan Kyla over at Coffin Kitsch has only intensified that extreme desire to own these goodies with her recent posts.

In the past, when I was selling my wares, the eyeball hair flowers and skull bows were one of my biggest hits. But this renewed hairbow trend has opened up an aspect of detail that never occurred to me, and adds oodles of dimensions to the otherwise planar surface. They utilize the beauty of the doll eye, which is readily available where ever you can find doll making supplies; a quick google search for 'doll eyes' yielded this supplier with a wonderful array of doll eyes in a few sizes: Enchanted Doll Eyes, but as a note, I've never shopped there, so I cannot vouch for the vendor.

Anywho-- as far as I understand, eyeball hairbows in particular are trending pretty strongly in Asian countries, such as Korea and Japan. This certain type of hairbow seems to be most available to us North American buyers either through Ebay or Kreepsville.

I'm faaaar too cheap to buy anything that simplistic, but it's so cute it merits the effort to attempt to make them-- ala, knock off. Shhh, keep it on the DL.

Source: Aliexpress

It should be said that the supplies for such a task is not cheaper if you're planning on making just a sole pair of hairbows. The price of the supplies totals roughly $47-- let's say $50.00 for good measure; a single pair from Kreepsville will run you $19, (ball parking shipping at about $5.00-- exaggerated slightly again to be sure) $20 to make it even. So say you planned on making a plethora of colors? This would mean you'll only have to make 3 pairs to break even.


The only thing purchased new in this lot was the hair snaps and the sculpey oven baked clay-- a total of about $9.00 from Walmart. The rest was what I already had; if you want a rough (slightly rounded up) price break down, here ya go:

  • Modge Podge-- I believe I purchased for about $5.00. Ideally you'll want an actual polymer gloss glaze, and it's about $5.00 too 
  • Acrylic paints-- assuming you just get the primaries and black and white is about $1 a bottle; so about $5.00
  • Specialized duct tape-- depending where you go, it could be cheaper or more expensive, mine was $8. (I went the expensive route cause I could not wait at that time of purchase)
  • Glue gun-- I bought mine with a coupon, I don't remember the original price, but I bought mine for about $7.00.
  • Resin or in my case model water-- $13. We have long been planning on building the U.S.S Constitution on water... that is why we have it. Ideally you want liquid polymer clay, and that'll run for roughly $10
I'm not going to include the palette, baby powder and measuring spoons because I'm just going to assume that somewhere in the household there is something similar-- if not, then it's super duper cheap to get them at the dollar store. 

In the beginning of the year, I had been casually toying with the idea of duct tape couture, though it fizzled out fairly quick-- I had this idea of making a black duct tape corset with lots of bows, and neat cutouts; it's the reason I had bought all these rolls of black duct tape I now have-- blasted impulse. Who knows, I may yet go back to drafting-- thinking on it has rekindled that desire...
Well in my research I stumbled upon this slice of awesome DIY from The Ribbon Retreat Blog-- it is by far the best tutorial I have found for making duct tape bows.


During my frenzy for eyeball related jewelry, I found yet another fabulous tutorial on creating a life-like eye by Make It With Me blog. Although I must confess, I took plenty of liberties and deviated greatly from her tutelage...
I found that my method for the base of the eye is a little easier and quicker than her method, but it does lack the 3D pupil.


I found that a measuring spoon was excellent for making a perfectly shaped flat-back eye-- and in many different sizes! The bottom of the measuring spoon also worked in making the dimple for the iris

Sadly, the downfall of this trail came in the form of E-Z Water...


I had suspected it would not work out to be clear because the pellets had a yellowish tinge... add to the fact they were pellets and not a nozzled bottle of greatness in a bottle (liquid polymer-- it dries clear).
It was a hassle melting and then pouring the product into the eyes, and it always came out a little bubbly despite following and even cutting the melting time after each trial.


Even when I did manage to keep the bubbles close to none, the yellow coloring really threw off the color of the iris. She doesn't mention using glaze, but I wanted a sort of glossy-wet look, and I had hoped Modge Podge was a good substitute for this... well it wasn't. As thin as I tried to coat it, it still came out too textured. Hopefully soon I can nab myself a bottle of liquid polymer and glossy glaze.

Top one is supposed to be purple, but the yellowing turned it somewhat brown
From close up, you can see every imperfection of my first trials (the more successful ones, at that).
However from afar...


It's not so bad! 

Edit to add 09/29/2013:
Alright, so I mentioned in the comments below, I think I'm getting the hang of reducing the yellowing occuring with the E-Z water, along with minor differences in the amount of bubbling. All I did was reduce the depth of the dimple for the iris by about half of what I was initially doing. Take a look for yourself!


 I also took the chance at creating the 3D pupil and baking it inside the dimple; most times it didn't stick on its own so I had to glue it in before painting. I think there's a special polymer glue for this situation... but in my case, I just used super glue. I also tried adding some glitter into the iris using some of my glitter nail polish.


Turned out much better than the first day of making eyeballs, but there is yet another problem with the addition to the new 3D pupil. The E-Z water now bubbles only around the pupil, instead of all around the iris. I'm determined to get this right!

In the meantime, a very minor detail was also bothering me-- the white outline of the tape around the cut edges. I fixed it with a little bit of black paint and sealed it with modge podge for gloss effect.

Left: unpainted, Right: Painted
Here are a couple new shots of the latest bows:


Monday, September 23, 2013

Spooky Basket: The 'Get Well' Gift That Gave In Abundance.

My mother had sent me some money and well wishes during this time of austerity and health concerns-- she felt I had been cooping and sulking all this time, and wanted to give me an excuse to get out.
She was completely right, I had been doing just that.

She left a message in the gram "Happy shopping, I love u!".
I couldn't help but feel like a child again-- in a good way-- being loved by your momma, and feeling giddy at having cash in my pocket purely for spending on little frivolities.

Her intense generosity is a reminder of how much I miss her company, because with all the things I bought with this money, I would be testing or sewing it with her; she would let me do her makeup while we watched our dramas and chick flicks, and she would sit and chat with me while together we would sew something up. They are always times I really cherish; thanks to this blog, I can keep showing her what I've been up to and what I purchased with her gift.

Usually I go into shops not really knowing for sure what I am going to purchase, but with a very vague idea of what I want to try out. This time, I let myself strategically plot the coming months with the projects, and purchased accordingly.

I've been coveting the dresses from Hell Bunny... specifically these dresses:
Source: Unknown
Source: Atomic Cherry

But I can't seem to find where to purchase the first, and further more... they seem simple enough to add my own twist to; A.K.A recreating them myself.

Since making this apron for what feels like forever-and-a-half ago, I felt like I really needed an actual dress that was similar to it... I still have a few yardage left over of the day of the dead fabric. This Hell Bunny dress was just the inspiration I needed to pool my motivation into buying the notions needed to make it happen-- minus the pom pom trim... I'm not sure if that'll make it to the final dress, heh.


This came into the lap of having the desire to try out more patterns, and having a few on my wishlist that I really wanted to experiment with. Patterns are a nice way to bide my time, because I don't have all the tools I need to draft the more complex patterns, at present; they lie somewhere in the cavernous abyss I call the boxes I packed back in Canada.... and I've been too incredibly lazy lately to draft them anywho.

Entrez Halloween fabric and patterns.


They're all New Look patterns... what can I say, I love a decent sewing challenge, despite my laziness-- and New Look offers just that.
The two upper fabrics weren't purchased with the money my mother gave me, and are probably not going to be turned into dresses because of the nature of the type of material; I had purchased these very late in August, and just hadn't blogged about them yet.
The spider damask is very thick, and has an almost flocked silvery pattern-- I find it suitable only for a vest or maybe some other accessories. The pumpkin and candy fabric has glitter in the weave, also making it rather sturdy-- I have a very cute corset in mind for this fabric.

Now the lower two... these will be dresses, along with the day of the dead fabric.

The eyeball fabric will be view A from pattern 6457, the spiders will be made into view D from pattern 6143, and the day of the dead into view C of pattern 6208 (all circled in the fancy frame)

Eyeball

Spider

Skulls

After having purchased this mess of notions, fabrics, and patterns, I actually had lots of money left over (you can thank preparation and planning for that!). After having visited Walmart and Joann's, off I went into the malls of madness, not far from where the two stores were located...


I took a visit to Hot Topic hoping to find the Black Heart skull shaped nail polishes, after seeing the post Karoliina published on her blog. Indeed, they were there... and much much more skull shaped cosmetics that I regret not cleaning them out of. The rest of the cosmetics were found at Walgreens, Target, Walmart and Dollar General. I'll make a proper post of all these in the future, once my trials are done.

While in target, I happened upon the shoe section... nothing much of note... that is, until I hit the children's section. Behold!


And they were on sale for about $8... which makes it that much sweeter. Size 5 is the highest they went; sometimes it really pays to have such tiny feet.
Sadly, when I got home, the fresh scent of virgin shoes lured my cat once again... and off went one of the rhinestone buttons.


You'd think I'd learn my lesson from the first time, right? ... wrong. Luckily, I was going to change the buttons anyway-- I just haven't decided if I am to use bat or skull buttons... hmmm.
I love how they very nearly match the color of my favorite nail polishes (including the new), and my new baked eyeshadow from Hard Candy in Super Nova.


I sense an outfit brewing.... Thanks, Momma!

P.S. That reminds me... I still need to work on this, which by majority vote turned out to be the shorts. I have so much to do now! How exciting!

Tuesday, September 17, 2013

Fashioning My Cyber Microcosm: "Hmph" Said The Bat

The month has been creeping by slower than I could possibly tolerate.
Unfortunately, just days after my last post, I became a bit sick.

Gallstones-- hooray. <rolls eyes>

Having to actively monitor what I eat, how much I eat, and when I eat, before I receive the surgery has become such a drag...
It's a hurdle that feels much like weaning off some drug I was addicted to... I am definitely not happy if I don't get to eat whatever I damn well please... but such is the life of a person who disregards structure in many senses (most cases without intent)... including healthy habits, much to the dismay of the loved ones.

You see, I found myself in this predicament purely because of how seldom I actually eat; not how badly the foods I eat are. Ordinarily, my meals (when eaten) are highly balanced-- meat, grain, veggies... the whole deal. But I have been indulging myself in high fat meats in the past months; pork and beef. And since I am genetically predisposed to gallstones, this caused my system a bit of a shock and thus gallstones were formed and now causing heaps of pain.
It's not entirely my fault-- that is to say, my budget for groceries is quite strict, limiting the amount of proper ingredients I'm able to purchase... and as of late, the price of chicken and fish has been sky rocketing out of control at our local grocers. They seemed to have raised all their prices, matter of fact...
They're the only supermarket within a 40 mile radius, sadly, and lets be frank... their "fresh" food is never the freshest; the veggies go bad within days of purchase, and you ought to watch their dairy because they're always trying to foist off their past dues to an unsuspecting poor devil.
It happened to me twice... the last time was a very bitter and chunky guava yogurt drink-- I was looking forward all day to my treat that I simply forgot to check the date; the time of purchase it was already 2 days past due. At least it was only 2 dollars...

We bit the bullet and bought the exorbitant chicken and fish so that I can have some joy during the most eventful part of my daily existence... I can't and won't live on just salad-- I absolutely refuse to. I have always refused eating what cannot provoke a positive emotion from me, and salad in every form has always been at the tippity top.
But you want to know the real irony? Whatever power saw it fit to do this to me dealt its final blow with a sinus cold. So not only can I not eat what I want, but the foods I can eat... I can't taste. At all. For a few days now...

So, here I am, typing this obnoxiously long post with nary a positive point so far...
You all deserve at least one... let's see...

I made this thing in a bout of frustration at seeing the bathroom so tremendously cluttered with my primping gear.


Or at least I think I was frustrated at the mess... it could've been just the catalyst and focus to my frustrations for the former subject.
It is made from the junk I have lying around the house; a box, and a few random containers (tea tins, and Parmesan jar)

I simply traced where I wanted them to sit on the rectangular box, cut it out, placed the jars in and taped the sucker up with masking and duct tape.

And so ends the jumbled display of heat styling tools upon the bathroom shelf... next step is de-cluttering the rest of the bathroom. The tea tins give the added bonus of not having to wait till my flat iron or curling iron cools down before I can put them up.

Mind you, it's not going to remain undecorated-- I wholly intend on doing so, but at the moment I haven't found trimmings that fill me with gusto. One absent feature is certain, however, I am going to put a couple strips of magnet so I can store my pin curl clips in an orderly fashion.

... funny... I don't even know how to use these tools properly... they're purely for experimentation and attempts at doing my hair up in ways other than a pony tail or side braid. Hmph.


Related Posts Plugin for WordPress, Blogger...